Showing posts with label sewing. Show all posts

Sunday, March 11, 2012

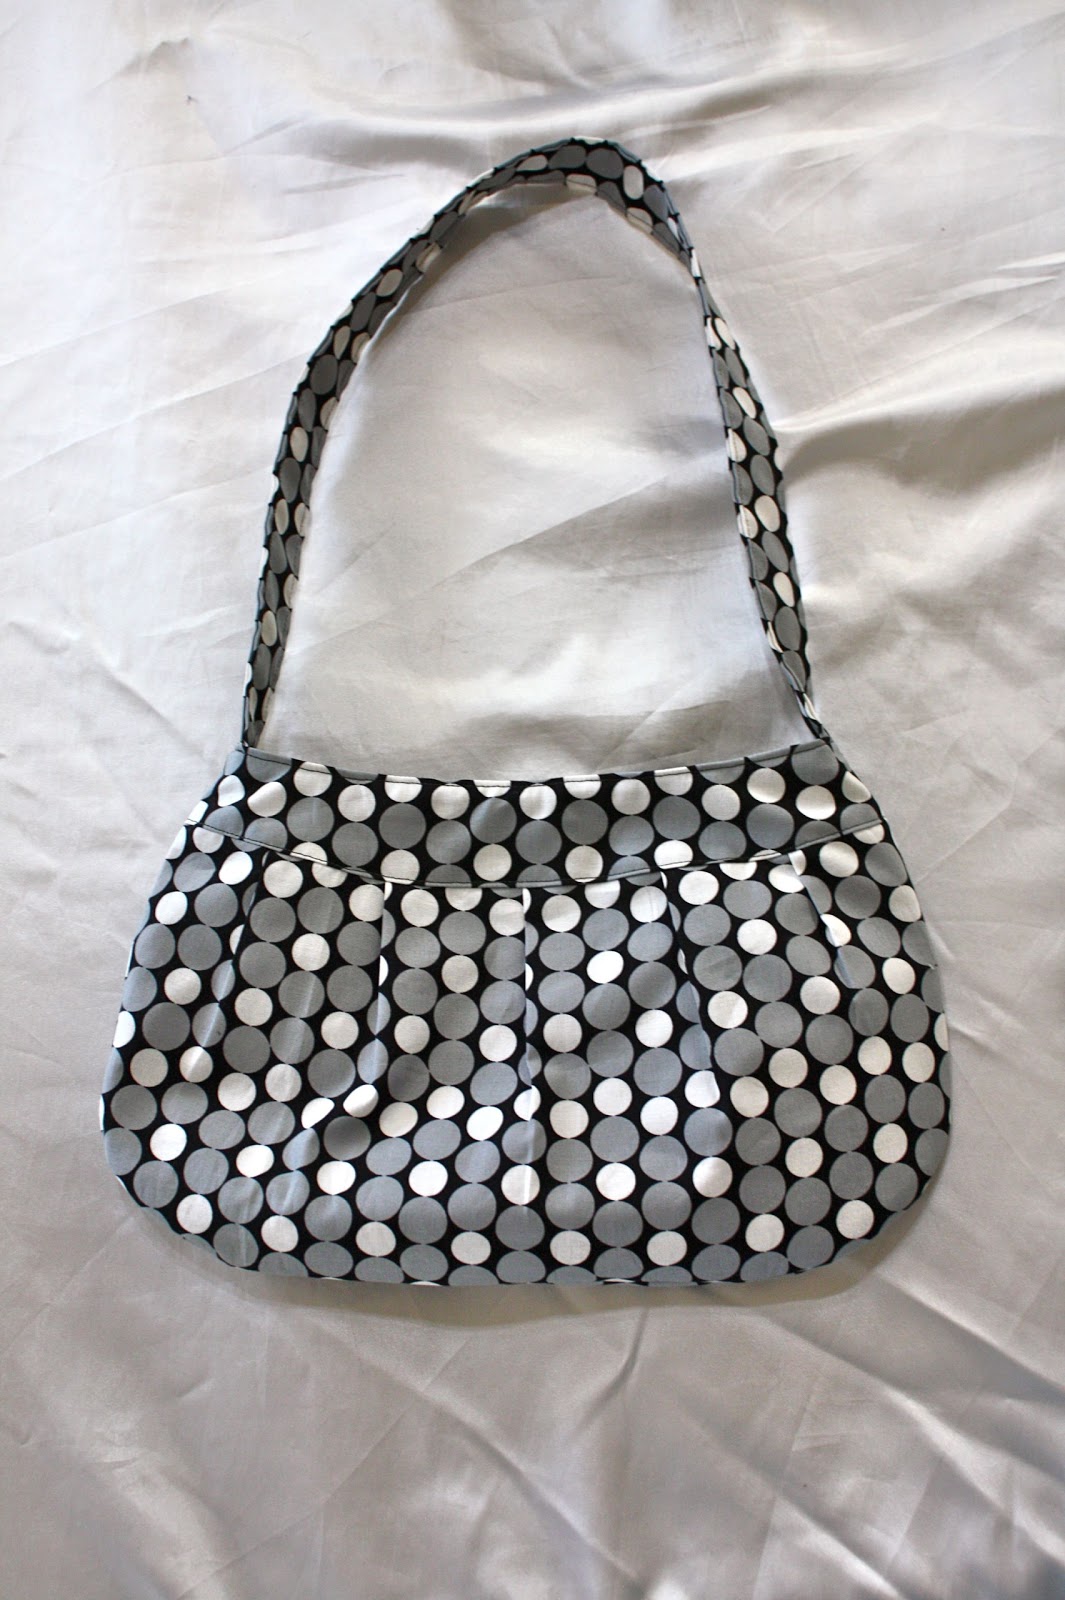
Buttercup Bag

I haven't made the buttercup bag in a while.  I decided about a year ago to actually buy the pattern with the license to sell it, then never made it.  Sometimes I do silly things like that.  I have had "plans" but just never did it.  SO, a friend had a birthday and I thought I'd better make her something.  I decided to do a purse for her and so I busted out with the enlarged version of the buttercup bag.  I found this cute fabric at walmart and I think it turned out really cute.


I didn't want the inside to be JUST black so I put a strip of the polka dot fabric just at the top of the pocket.  I love how the inside turned out.


I like the light blue flower too.  It gave just the right tough to finish it off.   I hope you like it Kerry!

Thursday, January 12, 2012

Why Hello

It has been almost ONE MONTH since I blogged.  Let me just tell you that I didn't plan that.  IN fact I have at LEAST 3 blogs that I took pictures for and never posted.  Ever since we moved we have had major problems with our internet.  I would get to the end of my blog and hit the publish post button and the internet would stop working and I would lose it.  It was very frustrating, not to mention a big fat waste of time to sit around and write a post to not have to save or publish.  BUT we think we have got it all squared away now.  My problem now is getting back into the habit of posting.  It's not that I do not have projects going on.  I have had many finished projects.  Those I have pictures of I will slowly start to post.  My project for today is an ear warmer.


I made this for my sister using an old Old Navy sweater.  I cut it up and sewed it together to make the ear warmer part.  Then I put two buttons on it which are a pretty pale yellow ( LOVE yellow and grey together ) and then made a crochet grey flower.  I LOVE how it turned out.  She walks daily with her best friend Liz and so I made them both ear warmer's for Christmas.  Hopefully they enjoy them and use them on their walks to keep those ears warm.

Now here's hoping I can get some more stuff up.  My parents and sister and her baby are coming tomorrow and will be here until Tuesday so I am hoping that maybe I can get a bunch of stuff posted today and scheduled for them to post through out the weekend.  Crossing my fingers!

I hope everyone had a wonderful Christmas.

Wednesday, October 12, 2011

Gathered Flower

Some where on the net I had found a flower tutorial and read it but never book marked it or pinned it.  I remmebered it the other day and decided to give it a try while watching America's Next Top Model!  ( Are my sister's, mom and I the only ones who LOVE that show?! )  Any ways.  I got it done but wasn't sure how to put it together completely so the next day I got on line to find it.  CAN'T FIND IT ANY WHERE! Boooooo  I spent like 3 hours off and on looking for it on the internet and pinterest.  It was driving me CRAZY.  Yesterday I was attempting to clean some of my craft stuff and I found a piece of paper my mom had given me with instructions on how to make several fabric flowers and it was on there!  AHHHHH  I wanted those other 3 hours or so of my life back.  So frustrating.  But before I had realized I had the instructions all along I went ahead and put the flower together how I wanted it to be and put it on another garter.  I LOVE how it came out.


So my question to YOU guys is DOES SOMEONE HAVE THIS BOOK MARKED OR PINNED SOMEWHERE?  You make this flower by take a piece of ribbon or fabric and you basically stitch up and down the length of the ribbon in a zig zag pattern and then you pull the stitch to gather it.  You get this gorgeously gathered petal flower.  Any ways if you have a tutorial for it PLEASE let me know.  I want to see how they say to assemble it AFTER you gather it.  I just kinda did it best I could but am curious what the actual instructions say.

So THREE people have signed up for the giveaway.  And I am giving away THREE things.  haha  SO far I have automatic winners!  If you are reading this now thinking, "What giveaway?"  click here  to check it out and participate!

Tonight we are doing a craft night for the ladies at church and I am teaching them how to make flowers. We'll see how it goes.  I am really excited and hope it will be a success.  "See" Y'all tomorrow.

Thursday, October 6, 2011

More Garters

I finally made some more garters.  I like how they came out.  I had been looking on etsy and noticed that quite a few people who were selling garters decorated stretchy lace.  I thought that seemed like a really cute and fun idea.  Not to mention EASY!  So here is what I came up with


Isn't it cute.  I think this would be so cute around a brides leg.  I bought a boring one from the store.  I wish I was as crafty now as I was when I got married.  I would have made tons of stuff instead of buying it and it would have been cuter.  I am not planning on getting married every again so oh well.


the last two are matching ones so I was thinking of selling them as a set.  A toss garter and a keep one.  We shall see.  My etsy shop has been SOOOOOOOOOO slow lately.  I haven't sold anything in weeks but I spent a bunch of money buying supplies and haven't managed to make them yet.  I am seriously going through a rut right now.  I am thinking of doing a giveaway next week.  We shall see.  I was thinking about having next week be HAIR week and then giving away one of the hair things from my shop.  Would anyone be interested in that?  the rest of the week I was going to post hair ribbon tutorials and what not.  Either my own, or ones I find on line.  We'll see.  Leave me a comment if that sounds at all interesting to you.  I hate putting lots of effort into something only to have no one respond.

Pinterest has been one of my many down falls.  I LOVE IT!  But it takes up time that I could be using to do something else.  I usually get on pinterest when I only have 5 minutes.  You know like, I am making my kids grill cheese and so I will go through things on pinterest in between flipping the sandwich.  So pathetic I know.  It makes me feel like I am doing SOMETHING other then cleaning, cooking and helping my kids with stuff.  I am hoping to get into a better groove and better time manage soon.  Because it's killing me to be so out of whack.

I potty trained my girl this weekend.  She is doing really well.  Last night I put on her diaper so she could go to bed and then we were reading scriptures and she says, "I have to go potty!"  and ran to the bathroom, took her diaper off and went on the potty!  WOO HOO  I am SO happy she didn't just go in her diaper.  Today we haven't had any accidents and I am crossing my fingers it stays that way.  Happy Thursday everyone!

Wednesday, October 5, 2011

Halloween Costume Fix

My kid is BIG!  He is in Kindergarten and he wears a size 8 in boys for shirts and a 10 in pants.  Seriously.  Most of the kids in his kindergarten class are HALF of his size.  Especially the boys.  He had a certain Halloween costume he wanted.  My in Laws came and visited here two weekends ago and took us shopping.  They really wanted to buy them Halloween costumes.  We found the one Tyler wanted but they only had one size and it was a size 4 to 6t.  Hmmmmmmmm    The store also didn't except returns.  I knew he would have a melt down if we didn't get it.  We had been shopping ALLL day and he was tired and wanted a costume so bad.  We bought it.  We got home and it fit pretty good BUT if went right up him bum and was a little short.  I said, "Don't worry, Mommy will fix it!"  Even though I had no clue how I would go about doing that.  My Mother in Law looked at it and said, "Why don't you just add material to the center?"  BRILLIANT!  So glad she was here because I don't think I would have thought of that SIMPLE solution.  The costume really did fit him pretty good every where else.  It was just not long enough in the body for him.  He is like his mom and dad and has a long body and shorter legs.  

Yesterday was the big day.  I picked the seems and took the top off of the bottom.  


See how the middle has a belt that is white that attaches to the sides?  I took that off and then added a white band across the stomach.


Here's my white section I am adding to the middle


I attached it to the legs first and then attached the top and bottom together again.  THAT'S IT!  We now have a costume that FITS him and I mean REALLY fits him.  If we had found a size 8 to 10 I bet it would have been too big on him.  This one is nice and tight ( which when sporting muscles I think it should be )

Sorry the picture is blurry.  I couldn't get him to stand still he was so excited!  Do you have a costume that is too short?  Why not fix it yourself.  I bought the extra material at JoAnn's and it was expensive so it was a good thing I only needed a little. Make sure the fabric stretches.  Kayla's Jessie costume from last year is too short and small on here too so I am going to do the same thing with it.  It won't look like it belongs on hers but she won't be wearing it out of the house.  My kids just like dressing up.  They were wearing their Woody and Jessie costumes yesterday running around the house pretending to be cowboys.  


See how short is costume is on here.  Hopefully one of these days I can fix it.  She would be SO happy!

Wednesday, September 21, 2011

Making Garters

I love garters because they are SO easy to make and the possibilities are endless when making them!  I mean really, you can do or use anything for them!   Weddings, bridal gifts, bachelorette parties, Valentine's day; they are good for many occasion's.   I thought I'd give you a quick tutorial on how I usually make them.  Again, you can make them differently but this is how I usually go about making them.

Okay first thing I do is find some satin ribbon.  What size you use depends on how big you want the garter to be.  I usually like smaller ones but the one I am showing you in the tutorial was one I made for a client recently and so I'm using that.  I took satin ribbon ( that I found at the Dollar tree! )  and if you can measure the recipients leg, then do so.  I have HUGE thighs so I usually measure a smaller part of my leg.  You want to cut your ribbon longer then your measurement so we can gather it.  Again, how much you want it to gather is up to you too.  Generally speaking if you cut the ribbon at around 25 or 26 inches long, you should be good. The ribbon I used was wide so I knew I was going to have a border coming off of both sides.  YOu don't have to do this but this is what I did for this one.  I'm goign to show you pictures of some other ones I have made at the end.


Here is a picture of my supplies!  Lace, ribbon and some measuring tape.


I measure out 26 inches of ribbon and cut TWO pieces.  You need one for the back and one for the front.    I also had to cut down my lace because this is a sheet on lace and not lace used for trimming.  If you have lace that is already cut down for you then you have one less step!


Here you can see that the ribbon is centered with the lace.  If you only want lace coming off of ONE side, then make sure to pin it that way.


Make sure your second ribbon is also pin to the back.  Usually when sewing everything is right sides together.  This time you want the right sides facing OUT because we are not going to be turning any thing.


Find where you want the elastic to be and we are going to create the casing for it.  I wanted the center to be about 1/2 inch or so.


See?!  Basically I am doing a 1/4 inch on both sides!  Turn the ribbon around and do a 1/4 seem on down the other side now.


Don't worry too much about the satin puckering up or gathering where you don't want it to.  Remember we are going to add elastic and it will be gather any ways so it will not be noticeable.

I don't have a picture of this next step but you need to feed your elastic through your casing.  I use a safety pin on one end of the elastic and then feed it through.  When you get to where the elastic on the end without the safety pin is at the end, pin it in place so you don't lose your elastic inside of the casing and have to start over.   Then I get it to the other end ( the side WITH the safety pin ) and pin that in place too


Next I put my sewing machine on a zig zag stitch and I sew the ends closed.


They don't need to line up perfect because I trim the excess off and now you have a garter ready to be embellished!  Isn't it pretty.  If you get your ribbon at the dollar store these are SO cheap!  They are pretty fast and easy to do as well.  I like to take mine and embellish them for weddings with a personalized stamped charm!  Most brides want to have their future husbands names on the charm and have the wedding date on the "toss" garter.  It makes for a fun and personal thing for your wedding day. I bought my garter and I kinda wish I had been crafty enough to make it back then.

So here is the finished product after I added the charm and the embellishments.


This one was a little bigger then I usually make them but I think it's cute!  Here are some others I have made


So be creative and have fun!  I have one in my shop in animal print with a charm on it that says, "Take me"    I made it with fabric.  When making the garters with fabric you want to put the two pieces of fabric together and stitch along both long sides with right sides faces.  THEN, you want to turn it right side out and THEN make your casing for the elastic.  That way you don't have any raw edges.

Any questions let me know!  OH!  I just realized I didn't tell you what size to make your elastic.  YOu want to make it an inch or so SMALLER then your thigh measurement.  So if you are 20 inches around your thigh make it 19 or 18 inches long.  You want it to stretch a little but not TOO much!  The first time I sold a garter on line on etsy, I made it too small because I didn't ask the bride to be what your thigh measurement was.  She had to send it back to me and I had to re make it so that it would fit.  Opps!  You never want to make something twice.  So be careful but most importantly have fun!  These are supposed to be pretty, sexy and fun!  Go to town

Monday, September 19, 2011

A Few More Projects

My son owns a Leapster Explorer.  He loves it.  He has to earn games by trying to new foods ( which pretty much NEVER happens! or by doing things around the house. ) Basically we bribe him which I am TOTALLY okay with.  You do what you gotta do sometimes.  He really needed a case for it but I REALLY wanted his case to be able to hold the games as well.  All of the manufactured kind in the store only hold the actual leapster.  BOOOOO  I finally got around to making him my own.  I even did a tutorial for it!  However, after just a couple of hours of using it I found it's not very practically.  It would be an easy fix but I haven't had time to fix it yet.  Here's what it looks like.


The Leapster goes in the main pocket to the left and the little pockets to the right are for the tiny games.  There are 9 pockets and right now we only have 3 games so we have room to grow.  The part where I messed up is that I didn't close off the pockets with velcro.  this means that when my kid goes to close it, the games slide out very easily.  Not good.  I will fix it one of these days but for now we are just happy we have a case for everything.

The only thing I have worked on this last week was some wedding accessories.  I get request for wedding garters on etsy a lot.  Here is the latest


I made a tutorial for garters too!  Hopefully sometime this week I can post it.  Garters are actually SUPER easy to make.  I usually use satin ribbon and then it makes it even easier.

Then I made two hair clips for weddings. These aren't for anyone specific, I made them just because I thought they were cute and they have been getting a lot of people in the shop I am selling hair clips in looking for wedding stuff.  Not a single one of my hair clips has sold so I figured I'd better change my strategy.  I dropped them off today and the owner thought they were SO cute!  Hopefully that means someone will buy them.


So we'll see what happens.  I HATE not having time to do things.  I have so many hair clips in my head that I want to try to do but I am having a hard time managing my new time schedule with my son in school and my daughter needed mommy time.  I have also been trying to work out everyday which is proving to be difficult.  I know this isn't new.   Every mother struggles with time management and I know it's just a matter of time before I get into a good groove.  I am telling you that I am ADDICTED to pinterest!  I know this isn't knew to anyone yet either but I have been finding the GREATEST stuff on there.  Since we are going to be moving into a new home in 2 plus months I have been trying to find good decorating ideas and things.  Here's hoping everything goes well with the house.  The bank did not choose to foreclose since we had already gone into escrow.  Now we are going to do the inspection and hope things go well with that!  Cross your fingers for us.

Is anyone thinking about Christmas already?  I am NOT one of those people who start playing Christmas music at home or getting out my decoration before December 1st.  In fact, I don't listen to Christmas music at home at all.  I get enough of it when I go out.  I am annoyed that stores are already stocking up on Christmas stuff.  I DO however, start thinking about what I am going to MAKE people for Christmas.  I am hoping to make a lot of fun "green" things for people this year.  We shall see what happens.

Monday, September 12, 2011

Thomas the Train

Here are the pictures of the Thomas the train hat I made for my friends boy last week.


I am sure it looks cuter on and I am crossing my fingers it actually fits him!  :)

This is with the Jack and Jill pattern from izzy and ivy. Very easy pattern and it gets easier every time you try it.

Saturday, September 10, 2011

HATS!

I got to sew on Friday and let me tell you it was SO nice!  My friend Sarah has a boy turning 3 who LOVES trains.  I made him a kind of conductor hat with Thomas the train on it.  I like how it turned out and now I am just crossing my fingers it fits!  They live in Texas so I can't just measure his head and make sure it fits.  Cross your fingers for me.  I'll post some pictures of it later.

While I was making the train hat Kayla grabbed it half made and said, "Oh mom I love it!"  So I told her it was not for her but that mommy can make her a new hat too.  She has been carrying around some Dora fabric like it was a blanket and I have been wanting to make her a new dress with it.  Instead I decided to make her a Dora hat!  I LOVE how it came out.


She was NOT into having her pictures taken with it on though.  I gave her my phone because she wanted to do a puzzle and I told her if I let her do a puzzle she needed to let mommy take her pictures.  Can I call a two year old a liar?!  haha  This is what I got


I got great pictures of the top of it!  So I said, "Kayla can you look up at mommy?"  So she did, however she brought the phone up over her face!


I got ONE good one

And then I got the look of death....


Well so much for awesome pictures of the hat but you get the point any ways right!  Oh yeah and I used the Jack and Jill pattern by Izzy and Ivy.  It's a great pattern and now that I have made it 6 or 7 times it gets better every time I make one!

Wednesday, September 7, 2011

Flower Tutorial

I'm not very creative when it comes to finding names for things.  So Flower tutorial will have to do for now.  This is a very simple tutorial and the finishing results is pretty fast and pretty cute.  You can use any fabric you want for this.  I tried two different kinds and I used two different ways.  The first time I tried just using a glue gun.  That was almost harder to do then a straight sewing machine.  Here is what the finish product looks like.


First I took a 37 in by 3 in strip of fabric


Take your strip of fabric and make a long string of glue down one of the long sides...gotta be fast so the glue doesn't dry.


Then fold the fabric in half and press the sides down together so the glue sticks


Next take the new strip and cut on the folded side alllllll the way down to make petals for the flower


Make these whatever size you want.  Try different sizes for different looks.   Then you need to start your flower.  Add a little glue to the end piece and then roll.


Now work your magic the rest of the way down with the gun and then roll.  Glue.  Roll.  Until you get to the end.


You can make the roll really tight for a fuller flower or make the roll kind lose for a less full flower.


I love the way the end roll looks!

And there you have it!  I think it looks really cute by itself or you could add a pretty button or some ribbon in the center


Next I tried it with sewing instead of glue for the first step.  I think it actually went faster and was less messy.  YOu can do it by hand by with a machine.  I'm lazy so I used my machine.

For this flower instead of doing one long strip I decided to do a bunch of shorter strips with different coordinating fabrics.  Mess around with the lengths and don't worry about making then too long.  You can always cut them if they are too long when you roll them!


I love how colorful it is!

Then I added something to the middle.  This is actually a brad for scrap booking but it had great color!


I then decided to make a wider one.  I took a piece of thick interfacing and started with the OUTSIDE circle and sewed it down using my machine.  You could use the glue too because that would have been just as easy or you could sew it down by hand.   Once I was done with one color ( if there was extra I just cut it off ) I just grabbed a new color and started sewing/gluing again!


The center I took the part of the green one I had cut off because it was too long and rolled it and glued it in the center.  Again it looks good by itself or with a colorful button in the center!


These are SUPER easy and can look really elegant or really fun depending on the fabric and button you use for the middle!  I haven't had time since I made these last week to try new ones with different fabrics.  I also want to make some more with a much wider petal.  The wider the petal the more the flower kind of looks like a flower you would buy in the wrapping paper section!  I love them.  Oh how I wish my daughter would let me put things in her hair!  Now I either need to gift these or put them in the shop.  Someone please convince my daughter to leave something in her hair!  Pretty please?!


Related Posts Plugin for WordPress, Blogger...