So I have been on the internet looking for different kinds of free crochet patterns. I am LOVING Youtube these days. I have never really used youtube before but when I started looking up crochet stuff I found someone who makes all kinds of crochet video's and I love all of her stuff. I have started a board on pinterest for all of the patterns I have been finding. I made a hat for me using a video but then I REALLY wanted to try and make a hat using a pattern. I haven't really been able to figure out the patterns yet. My mom helped me while I was in Utah for Thanksgiving and so I decided to go for it and try. I actually made a hat and it ACTUALLY turned out cute! It was supposed to be for me so it is a little long for Kayla but it was too tight and looked ridiculous on me. Mostly because I messed up my count and when I got done I realized that instead of there being 58 stitches I only had 40 something! haha Yeah, that could be it. :) Any ways here it is
Any ways. In case there are people out there wanting to make one too here is the free tutorial I found and used HERE
ENJOY! I'll be posting more as I find them and make stuff. I can't believe I got to post TWICE in the same day! WOO HOO Let's hope I can keep it up and get some more stuff up on here over the next week or so.
Showing posts with label other blog tutorials. Show all posts
Friday, December 9, 2011
Tuesday, October 11, 2011
What I Love
What I LOVE most about flowers is that you can use them for just about ANYTHING. Doesn't have to be a hair thing. Could be a broach, some shoe clips OR the top to a pen. My friend Fabi over at Mrs. Sassy Crafter has a great tutorial on her blog for some flower pens. I was looking at it earlier and she makes the flower in a way I had NEVER seen before. Don't you just love that?! I love that a certain flower can be made so many different ways and look the same each time. Want to see the tutorial? I thought you'd never ask! Go check it out here She has LOTS of really creative things on her blog. Her latest obsession has making cards and they are so cute. So go check out here blog and make sure to look at all of her fun tutorials. She is a super sweet person too so leave her a comment and get to know her.
Wednesday, March 9, 2011
Stats?
Do you guys ever check your Stats on your blog? I didn't even know this existed until a couple of months ago I found it by accident. I get most of my blog traffic off of two different tutorials I did that got posted on totally tutorials. I HIGHLY recommend if you want more traffic to try and get something posted on that site. I have gotten over 2000 hits just on one of my tutorials because of them. Now for some people that is probably not very much for ME that's a lot. Any ways. About once a month I'll click on my stats to see where people are coming from and what they were looking for and the other day I say a weird one. I had like 11 page views off of this web site and I had NEVER heard of it. Apparently there is a web site dedicated to FEELINGS. Yeah....kinda weird right. Anything that is publicly written like a public blog, they check them for the words "I feel". If you have the words "I FEEL" or "I WAS FEELING" or something along those lines, they will add you to their data base. At first I felt weird about it but then I thought of well. I haven't noticed it on my stats again but it was so weird going to their web site and trying to figure out what the heck they were. Check your stats! If you are writing a blog look up at the top and it has 6 different tabs up top. First is POSTING and the last one is STATS. Just click on it and give it a try!
So I am feeling better. Not back to normally but better. I got a z pak and it is kicking my booty! I fell totally drugged out and exhausted. I am wayyyyyy behind in everything you can think of including posting green things on here for the month of March. So today since I still haven't gotten much done around here I thought I would post a link to a tutorial y'all should go check out. It is for a reuseable shopping bag that folds up nice and small so that you can put it in your purse. I was working on a tutorial like this too about a month or so ago and never finished it. Maybe I can manage to do that sometime next week. We shall see. Any ways here is the link
Fold Away shopping Bag
It looks like a great tutorial. I have one of these fold away bags that I keep in my purse at all times. I LOVE it. My sister gave it to me. She bought a 5 pack and gave me one, my other sister one and our mom one. I don't know about them but I use my constantly. I ALWAYS remember to use my green bags at the super market but I ALWAYS forget to bring my bags with me when going to Target or the dollar store. This way, you have a bag ALWAYS. Even if you forget you carry it.
So I am feeling better. Not back to normally but better. I got a z pak and it is kicking my booty! I fell totally drugged out and exhausted. I am wayyyyyy behind in everything you can think of including posting green things on here for the month of March. So today since I still haven't gotten much done around here I thought I would post a link to a tutorial y'all should go check out. It is for a reuseable shopping bag that folds up nice and small so that you can put it in your purse. I was working on a tutorial like this too about a month or so ago and never finished it. Maybe I can manage to do that sometime next week. We shall see. Any ways here is the link
Fold Away shopping Bag
It looks like a great tutorial. I have one of these fold away bags that I keep in my purse at all times. I LOVE it. My sister gave it to me. She bought a 5 pack and gave me one, my other sister one and our mom one. I don't know about them but I use my constantly. I ALWAYS remember to use my green bags at the super market but I ALWAYS forget to bring my bags with me when going to Target or the dollar store. This way, you have a bag ALWAYS. Even if you forget you carry it.
Thursday, February 24, 2011
Re-purposing Week: Day 4 TIES
My handsome blue eyed nephew Seth just turned one. His mommy wants to go get his pictures taken but she wanted him to wear a tie. That is where I come in. She told me what colors she wanted and I sent her a picture of all the fabric choices I had on hand. She picked on out and I got started. I looked on line at several place. If you want a really good tutorial with a printable template for OLDER kids, check out purl bee I had two problems though. I didn't want a REAL tie because Lauren said Seth pulls on everything. Second it was TOO big and lastly ( I know I said two but I guess it was 3 haha ) I like figuring things out because then I can make and sell them if I want to. Using other tutorials usually limits what you can do with the finished product. So after looking at ties on etsy and the different patterns that were available on there I finally just started making my own. I had bought a tie at the thrift store when I went with my sister and used it as a template. This is a great way to figure out how something is made. This was the first one I came up with.
Cute right? But can you see my problem? It was WAAAAAAAAY to long. My son who is 5 and HUGE for his age could wear it and have it long enough. SO this meant trying again. But I didn't want to waste my fabric so I picked something else out from my stash and went to work. This was try number two
Perfect! Now I just had to make it AGAIN in the right fabric. So here is what I ended up with for the Seth man
I can't WAIT to see his pictures because he has the prettiest blue eyes and I can only imagine how blue they are gonna look with this around his neck.
When Seth was a new born I had made him a tie out of an old brown one I got at the thrift store. ( If you were wondering why this post was supposed to be a repurposing one and so far I haven't "repurposed" anything here it comes...) And I found several great tutorials on line for transforming a mens tie into a baby tie. I don't know where the one is but you take the SMALL part of the tie to make the tie and then you cut off the rest and add elastic for his neck. His mommy loved it but it got to small too quick. She gave it back to me so I could fix it and I never did. OPPS. She mentioned to me how much she loved that tie. Well guess what? I found the left over of the tie and made him a new one with the big end. Here is what I came up with.
The nice thing about it is I have two ties for my photography prop box now. Also, this got me thinking about bow ties again. Last year I did a bow tie tutorial after finding one at the thrift store. You can find the tutorial HERE
I am getting the itch to make a bunch of bow ties now! EEEEEEE
Since this re-purpose was kind of a lame one, I am planning on posting again later. CROSSING my fingers any ways. You never know how the kids are going to be for me later. So come back later and check out what I get time to put up!
Cute right? But can you see my problem? It was WAAAAAAAAY to long. My son who is 5 and HUGE for his age could wear it and have it long enough. SO this meant trying again. But I didn't want to waste my fabric so I picked something else out from my stash and went to work. This was try number two
Perfect! Now I just had to make it AGAIN in the right fabric. So here is what I ended up with for the Seth man
I can't WAIT to see his pictures because he has the prettiest blue eyes and I can only imagine how blue they are gonna look with this around his neck.
When Seth was a new born I had made him a tie out of an old brown one I got at the thrift store. ( If you were wondering why this post was supposed to be a repurposing one and so far I haven't "repurposed" anything here it comes...) And I found several great tutorials on line for transforming a mens tie into a baby tie. I don't know where the one is but you take the SMALL part of the tie to make the tie and then you cut off the rest and add elastic for his neck. His mommy loved it but it got to small too quick. She gave it back to me so I could fix it and I never did. OPPS. She mentioned to me how much she loved that tie. Well guess what? I found the left over of the tie and made him a new one with the big end. Here is what I came up with.
Check out this tutorial for something similar to what I did HERE I didn't use this tutorial because there were parts I wanted to do differently but this gives you a great idea on how to do this. You can even buy matching ties for the whole family and then just fix the kids ties accordingly. Nice!
So here is all four of them
The nice thing about it is I have two ties for my photography prop box now. Also, this got me thinking about bow ties again. Last year I did a bow tie tutorial after finding one at the thrift store. You can find the tutorial HERE
I am getting the itch to make a bunch of bow ties now! EEEEEEE
Since this re-purpose was kind of a lame one, I am planning on posting again later. CROSSING my fingers any ways. You never know how the kids are going to be for me later. So come back later and check out what I get time to put up!
Tuesday, January 11, 2011
Looooooooooooong Overdue
About 5 months ago ( or so it seems ) I was gonna be out of town and needed someone to teach my lesson for me at church. I asked someone to do it and thankfully she said yes. To say thank you I wanted to make her something. She sews too so I wanted to make her something sewing related. I decided to make her a pin cushion. I of course waited until two days before I needed to give it to her to start it. I went on line and I found TONS of pin cushions. Here are some of the ones I found that I liked
Here
Here
Here
Here
There were a couple of others I had on here but when I checked the links, they were no longer there! Boooo
I had printed out a pattern for one the night before and then realized that there was just not enough time to make the one I wanted to so I settled for a different one. I got a jar of baby food and cleaned it out really well and took the paper off. Then I cut out a circle of fabric and made a ball. Then you glue that to the lid and then glue on some ribbon to hide the mess. That's pretty much it. It turned out REALLY cute! Stupid me forgot to take a picture though. But I wanted to make one for myself. I loved how it was a pin cushion that you could actually put stuff inside of. SO I got out my skull and cross bone fabric and went to town...well sort of. i got EVERYTHING I needed and even cut out a circle and then pushed it to the side. Here I am MONTHS later and still hadn't of done it. Well, yesterday was the day! I made it and as I was going to fill the ball with stuffing I remembered having the debate with myself when I was packing everything if I should take the bag of stuffing, or if I should throw it away because I "never use it!" I looked in a couple of boxes and determined I of course threw it away. What to do now...I had to improvise and so I took so strechy knit that was just sitting in a draw and balled that up and shoved it into the ball I made. Did it work? YES Did it look good? NOPE! BUUUUUUT I got my pin cushion done!
I will give you ONE guess what I found about an hour after I completed this project! haha Go figure
Here
Here
Here
Here
There were a couple of others I had on here but when I checked the links, they were no longer there! Boooo
I had printed out a pattern for one the night before and then realized that there was just not enough time to make the one I wanted to so I settled for a different one. I got a jar of baby food and cleaned it out really well and took the paper off. Then I cut out a circle of fabric and made a ball. Then you glue that to the lid and then glue on some ribbon to hide the mess. That's pretty much it. It turned out REALLY cute! Stupid me forgot to take a picture though. But I wanted to make one for myself. I loved how it was a pin cushion that you could actually put stuff inside of. SO I got out my skull and cross bone fabric and went to town...well sort of. i got EVERYTHING I needed and even cut out a circle and then pushed it to the side. Here I am MONTHS later and still hadn't of done it. Well, yesterday was the day! I made it and as I was going to fill the ball with stuffing I remembered having the debate with myself when I was packing everything if I should take the bag of stuffing, or if I should throw it away because I "never use it!" I looked in a couple of boxes and determined I of course threw it away. What to do now...I had to improvise and so I took so strechy knit that was just sitting in a draw and balled that up and shoved it into the ball I made. Did it work? YES Did it look good? NOPE! BUUUUUUT I got my pin cushion done!
I will give you ONE guess what I found about an hour after I completed this project! haha Go figure
Labels:
crafting,
Cute ideas from others,
other blog tutorials,
sewing
Friday, November 19, 2010
FINALLY
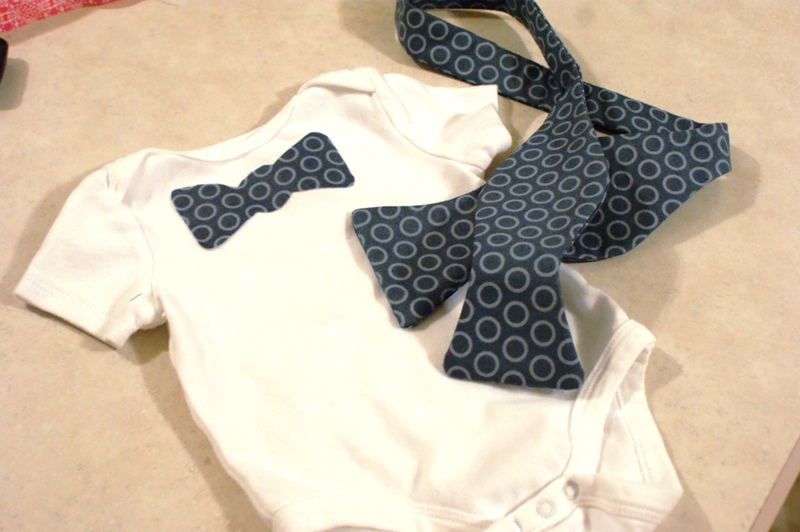
YEAH! I have something crafty to post! haha I feel like I have been doing all sorts of crafty stuff but not finishing anything so I have nothing to show y'all. Tonight I am going to share two things. The first being a present for my sister. I made my new cutie pie nephew a bow tie onesie! AND I made his daddy a matching Bow tie! I can't WAIT to see it on the two of them so if the bow tie doesn't fit I am going to be SO sad! I am also ( one of these days ) gonna make my sister a flower brooch out of the same material so they can all three be matchy matchy but in a cute non annoying way....at least I think it would be subtle enough to be cute. What do you think of the bow tie and the onesie?
The second crafty thing I have for y'all is technically not a finished product. I mean, it's FINISHED but it is a miniature version of what I was planning on making tonight ( but ran out of time ). My mom had a list of things she wanted to do with me while I was here. One of the things she wanted to do was figured out how to make self binding receiving blankets. We looked up some tutorials and one of the comments someone left said to practice on a small scrap peice of fabric the first time you try it. I am SO glad I read the comment and did that because the first one I did, I did it WRONG! The second one however, was a success! Check it out
Isn't it SO pretty?! I know it is hard to tell because I used two pieces of the same fabric, but these blankets look so good and so professional. I am planning on making one out of some REALLY cute flannel I bought yesterday for a friend of mine from college. She is having her second girl and I haven't seen her in years. She doesn't even know I am making her something but I thought it was a good opportunity to try out the tutorial and send someone something nice. I can't wait to post pictures of a done product! I plan on making some of these to sell because they are just too easy, always wanted and freaking CUTE! haha
In case anyone else wants to try their hand at these bad boys, here are the tutorials I found. I would read ALL three of them so you will understand. You might want to read the comments too because that's where I saw to make a small version out of scrap fabric first and I am SO glad I did.
Piece N Quilt
Fabric Family Fun
Everyday Mom
Go check them out and give it a try...I bet you become hooked too! Don't say I didn't warn you ;)
The second crafty thing I have for y'all is technically not a finished product. I mean, it's FINISHED but it is a miniature version of what I was planning on making tonight ( but ran out of time ). My mom had a list of things she wanted to do with me while I was here. One of the things she wanted to do was figured out how to make self binding receiving blankets. We looked up some tutorials and one of the comments someone left said to practice on a small scrap peice of fabric the first time you try it. I am SO glad I read the comment and did that because the first one I did, I did it WRONG! The second one however, was a success! Check it out
Isn't it SO pretty?! I know it is hard to tell because I used two pieces of the same fabric, but these blankets look so good and so professional. I am planning on making one out of some REALLY cute flannel I bought yesterday for a friend of mine from college. She is having her second girl and I haven't seen her in years. She doesn't even know I am making her something but I thought it was a good opportunity to try out the tutorial and send someone something nice. I can't wait to post pictures of a done product! I plan on making some of these to sell because they are just too easy, always wanted and freaking CUTE! haha
In case anyone else wants to try their hand at these bad boys, here are the tutorials I found. I would read ALL three of them so you will understand. You might want to read the comments too because that's where I saw to make a small version out of scrap fabric first and I am SO glad I did.
Piece N Quilt
Fabric Family Fun
Everyday Mom
Go check them out and give it a try...I bet you become hooked too! Don't say I didn't warn you ;)
Sunday, September 12, 2010
Looking
I am ALWAYS looking for cool ideas to share with y'all from other bloggers. I am especially excited to share them when it isn't from a well known popular 1000+ followed blog. I found something tonight while browsing that made me so excited to try. I wanted to share it with YOU and hopefully I will get to make one and share it soon. Go to HERE and check it out!
Monday, August 16, 2010
Feeling Lazy
Has anyone else hit the lazy bug? Or is it just me?! I am feeling MIGHTY lazy the last couple of days. I did get something made today. My niece has her first loose tooth. She is worried about it because it hurts a little and so I made her a pillow for her tooth. It didn't turn out as cute as I wanted it to but I think it made Madison happy.


The tooth fits inside the mouth. I got the template from MMMcrafts. Check it out if you are thinking about making one. I basically just went to google and type in tooth pillow or something and it was one of the first things that popped up. Happy hunting and I hope to not be so lazy tomorrow.


The tooth fits inside the mouth. I got the template from MMMcrafts. Check it out if you are thinking about making one. I basically just went to google and type in tooth pillow or something and it was one of the first things that popped up. Happy hunting and I hope to not be so lazy tomorrow.
Tuesday, August 3, 2010
Presents
I am so happy because I FINALLY finished all the gifts for my nieces and nephews in New Jersey. I wanted to make the girls purses so I started with the crayon purse you all already saw. Here it is again for those who missed it


Then I made Ashlee's. She said she liked green and so I picked the fabric and started the purse. I love it so much that I want to keep it for myself! haha I used the Buttercup Bag from the Made By Rae blog. I did the pocket different. The purse is so small that I figured a pocket would work better if it went all the way down to the bottom of the bag.

Isn't the fabric cute? I love it. Here is the inside


And here is what I did to the sides. I like these buttons I put on the handles

On to the next purse. Genna LOVES silver and sparkles. Her words exactly. I think she will be pleased.

I used a tutorial for that too Simply Party Clutch it is REALLY small. But she is 9 so I think it will be perfect.
On to the boys. First for Logan I made a crayon roll. He likes Toy Story so I made him one out of some Toy Story sheets

Hopefully he will like it. I made part of it out of knit and that was a BAD idea. Not to self and everyone else who reads this, NO KNIT when making crayon rolls. haha Then I made Joe who is 12 ( I think ) an ipod case.

So here is the girls stuff

And here is all the boy stuff

Which reminds me I forgot to post pictures of the tie onesies.


And her is everything all together

I think it all turned out good. I am hoping nothing falls apart and they love everything.


Then I made Ashlee's. She said she liked green and so I picked the fabric and started the purse. I love it so much that I want to keep it for myself! haha I used the Buttercup Bag from the Made By Rae blog. I did the pocket different. The purse is so small that I figured a pocket would work better if it went all the way down to the bottom of the bag.

Isn't the fabric cute? I love it. Here is the inside


And here is what I did to the sides. I like these buttons I put on the handles

On to the next purse. Genna LOVES silver and sparkles. Her words exactly. I think she will be pleased.

I used a tutorial for that too Simply Party Clutch it is REALLY small. But she is 9 so I think it will be perfect.
On to the boys. First for Logan I made a crayon roll. He likes Toy Story so I made him one out of some Toy Story sheets

Hopefully he will like it. I made part of it out of knit and that was a BAD idea. Not to self and everyone else who reads this, NO KNIT when making crayon rolls. haha Then I made Joe who is 12 ( I think ) an ipod case.

So here is the girls stuff

And here is all the boy stuff

Which reminds me I forgot to post pictures of the tie onesies.


And her is everything all together

I think it all turned out good. I am hoping nothing falls apart and they love everything.
Tuesday, July 27, 2010
HATS
I have never been a HUGE hat person. Lately I have been wanting a cute hat for when I am in the sun ( not that it is a lot! ) I found this tutorial a while ago and wanted to use it. I FINALLY got around to it. Go check it out HERE
It came out okay. It was REALLY easy but I made it a little to long on the sides. I am still thinking about fixing that but we'll see. So I took an old navy shirt that had a hole in the boob ( and not in a spot I could cover with a flower! It was RIGHT where my nipple was which was a total bummer. ) Any ways. Here are two pictures. I made two different accessories for it on brooch pins. The first picture is blurry sorry about that.


I might make one for Kayla. We'll see. :)
For tomorrow I have a tutorial! WOO HOO I hope I can get it up on here. I got lots of projects I am trying to work on all at once. Hopefully I can get it all done without going crazy.
It came out okay. It was REALLY easy but I made it a little to long on the sides. I am still thinking about fixing that but we'll see. So I took an old navy shirt that had a hole in the boob ( and not in a spot I could cover with a flower! It was RIGHT where my nipple was which was a total bummer. ) Any ways. Here are two pictures. I made two different accessories for it on brooch pins. The first picture is blurry sorry about that.


I might make one for Kayla. We'll see. :)
For tomorrow I have a tutorial! WOO HOO I hope I can get it up on here. I got lots of projects I am trying to work on all at once. Hopefully I can get it all done without going crazy.
Tuesday, July 20, 2010
Scripture/Bible case Tutorial
Pray I get through this before I get interrupted or something. Pick two different kinds of fabric. You don't need a ton of either. I measured my scriptures ( LDS Quad. ) and it was 7 1/2 by 13ish. I then took those measurements and added 1.5 to it for seam allowance, bulk and turning. Mine ended up being slightly roomy which I like better. I read a tutorial that said add 1.2 but that was a little small for me the first time I tried it PLUS I like even numbers! haha
So you need
2 fabrics cut to 14.5 by 9 ( I used the same fabric for each but one will be on the inside so you can use two different colors if you want )
1 14.5 X 9 in interfacing
2 panels for inside 14.5 x 9 ( 14.5 X 4in piece of interfacing )
1 pocket ( but you can do two pockets if you like ) at 12 x 3
2 handles 14 x 4
1 Velcro closure at 7 x 2
All of these measurements are changeable. I wanted my fabric closure to be a certain size but you can do whatever you want. This is a very versatile tutorial. It is basically to show you how to do it and you can create your own measurements if you would like.
Let's get started!
I started with my handles. I took my fabric and you are basically going to be making basis tape. Fold it in half and iron it. Then fold the two sides into the middle and iron again.
It should look like this opened.
Do you see all three fold marks? Next fold it back up
and sew it down both sides to finish it off. Do the same with the second strap and put them off to the side.
The inside panels need interfacing. I cut the interfacing to be 14.5 x 4 which is half the width of the actual fabric. What we will do is fold the fabric in half and add the interfacing in between the fold. I use iron on interfacing. It should look like this
Next the pocket for the panel. I used a 12 X 3 in strip folded in half vertically to form a 6 X 3 in pocket. Make sure the right sides are facing each other.
Sew up both sides ( don't forget to back stitch at the ends. Clip the corners
Then turn it right side out making sure to get the corners out if possible ( I am horrible at this and usually have rounded corners! Booooo ) then press with an iron
Next pin it to which ever side you want it to go. I wanted my pocket RIGHT on the inside cover so I pinned it to the left panel. Remember to open it up before you pin it
Also, notice I put the open end of the pocket facing down because this will get stitched closed two different times later so you do not have to worry about it being open still. Stitch both sides down. Don't forget to back stitch at the top of the pocket on both sides.
Go ahead and set that a side for now too. If you haven't done it already make sure you add interfacing to the right side panel as well in the same manner you did before. Like this
Now for the velcro strap. I took two pieces of 7 X 2in strips, put the right sides together, sewed down one side, over the top and down the other side. Then I clipped the corners
Turn it right side out and press just like with the pocket. I then added velcro and sewed it down.
NOW let's pause for a second. You are probably wondering why I left it so the stitches show on the velcro closure. I am adding a flower to it so my stitches will not be visible. If you do NOT wish to add something to the strap, then add the velcro BEFORE you stitch the two pieces together.
Next I pin it ALL together. I have to apologize because the first time I did this I sewed it WRONG and had to un-stitching everything and re-do it. It was annoying and time consuming. SO my pictures might confuse you but just remember this order
Inside 14.5 X 9 in piece facing up!
Next, two side panels all the way over to the sides with the un-stitched pieces facing the outside.
Next pin the straps on each side being careful NOT to twist them. THEN make sure your velcro closure is on the RIGHT side of your case. The first time I put it on the left like a dumby and had to fix that as well...I was trying to get through it too quick. Slow is always better people. It should look something like this
JUST REMEMBER: I messed up the first time and had the interfacing side facing UP! WRONG! You should be able to see the right side of the fabric in the middle. Now take the last piece ( which will be the OUTSIDE of your case ) with the right side DOWN!
Everything should be in this fabric sandwich. Pin it all the way around the sides BUT remember to leave an opening for turning. So I don't forget to leave an opening, I always leave two pins together where I need to stop like this
Then when I get to it I KNOW to stop
NOW, put your hand inside of the hole and grab a handle to pull on.
JUST REMEMBER, you have pins inside still! I went ahead and pulled all 5 pins out BEFORE I tried to turn it because I knew I would poke myself otherwise!
Turn it all the way out, trying to poke the corners out as much as possible and press it all the way around. Make sure to turn the material where the hole is into the fabric to line it up with the rest of it. Pin that close and then stitch all the way around the outside. It should look like this
At this point you are thinking, "YEAH I am done!" Not quite. We have to line up where that velcro strap is going to be. Put your case on your scripture/Bible and pull the strap over to line it up. Then make a mark on your fabric where the velcro needs to be.
Sew the velcro down but be sure to pull out the inside panel so you don't sew it closed
YEAH! You are done. The inside looks like this
And the outside
Don't you just LOVE my Dr. Pepper PJ bottoms?! They are awesome. I love them. I used THIS tutorial for the fabric flower. On my last scripture case I put a ruffle on it like this HERE. If you would rather do one like this try this tutorial on making a ruffle HERE and then add it to the front piece before sewing together. That is pretty much it. ENJOY.
Let me know of any questions and please post links in the comments if you make one. I would love to see what you guys do!
Linking to some parties


Show and Tell @Blue Cricket Designs

So you need
2 fabrics cut to 14.5 by 9 ( I used the same fabric for each but one will be on the inside so you can use two different colors if you want )
1 14.5 X 9 in interfacing
2 panels for inside 14.5 x 9 ( 14.5 X 4in piece of interfacing )
1 pocket ( but you can do two pockets if you like ) at 12 x 3
2 handles 14 x 4
1 Velcro closure at 7 x 2
All of these measurements are changeable. I wanted my fabric closure to be a certain size but you can do whatever you want. This is a very versatile tutorial. It is basically to show you how to do it and you can create your own measurements if you would like.
Let's get started!
I started with my handles. I took my fabric and you are basically going to be making basis tape. Fold it in half and iron it. Then fold the two sides into the middle and iron again.
It should look like this opened.
Do you see all three fold marks? Next fold it back up
and sew it down both sides to finish it off. Do the same with the second strap and put them off to the side.
The inside panels need interfacing. I cut the interfacing to be 14.5 x 4 which is half the width of the actual fabric. What we will do is fold the fabric in half and add the interfacing in between the fold. I use iron on interfacing. It should look like this
Next the pocket for the panel. I used a 12 X 3 in strip folded in half vertically to form a 6 X 3 in pocket. Make sure the right sides are facing each other.
Sew up both sides ( don't forget to back stitch at the ends. Clip the corners
Then turn it right side out making sure to get the corners out if possible ( I am horrible at this and usually have rounded corners! Booooo ) then press with an iron
Next pin it to which ever side you want it to go. I wanted my pocket RIGHT on the inside cover so I pinned it to the left panel. Remember to open it up before you pin it
Also, notice I put the open end of the pocket facing down because this will get stitched closed two different times later so you do not have to worry about it being open still. Stitch both sides down. Don't forget to back stitch at the top of the pocket on both sides.
Go ahead and set that a side for now too. If you haven't done it already make sure you add interfacing to the right side panel as well in the same manner you did before. Like this
Now for the velcro strap. I took two pieces of 7 X 2in strips, put the right sides together, sewed down one side, over the top and down the other side. Then I clipped the corners
Turn it right side out and press just like with the pocket. I then added velcro and sewed it down.
NOW let's pause for a second. You are probably wondering why I left it so the stitches show on the velcro closure. I am adding a flower to it so my stitches will not be visible. If you do NOT wish to add something to the strap, then add the velcro BEFORE you stitch the two pieces together.
Next I pin it ALL together. I have to apologize because the first time I did this I sewed it WRONG and had to un-stitching everything and re-do it. It was annoying and time consuming. SO my pictures might confuse you but just remember this order
Inside 14.5 X 9 in piece facing up!
Next, two side panels all the way over to the sides with the un-stitched pieces facing the outside.
Next pin the straps on each side being careful NOT to twist them. THEN make sure your velcro closure is on the RIGHT side of your case. The first time I put it on the left like a dumby and had to fix that as well...I was trying to get through it too quick. Slow is always better people. It should look something like this
JUST REMEMBER: I messed up the first time and had the interfacing side facing UP! WRONG! You should be able to see the right side of the fabric in the middle. Now take the last piece ( which will be the OUTSIDE of your case ) with the right side DOWN!
Everything should be in this fabric sandwich. Pin it all the way around the sides BUT remember to leave an opening for turning. So I don't forget to leave an opening, I always leave two pins together where I need to stop like this
Then when I get to it I KNOW to stop
NOW, put your hand inside of the hole and grab a handle to pull on.
JUST REMEMBER, you have pins inside still! I went ahead and pulled all 5 pins out BEFORE I tried to turn it because I knew I would poke myself otherwise!
Turn it all the way out, trying to poke the corners out as much as possible and press it all the way around. Make sure to turn the material where the hole is into the fabric to line it up with the rest of it. Pin that close and then stitch all the way around the outside. It should look like this
At this point you are thinking, "YEAH I am done!" Not quite. We have to line up where that velcro strap is going to be. Put your case on your scripture/Bible and pull the strap over to line it up. Then make a mark on your fabric where the velcro needs to be.
Sew the velcro down but be sure to pull out the inside panel so you don't sew it closed
YEAH! You are done. The inside looks like this
And the outside
Don't you just LOVE my Dr. Pepper PJ bottoms?! They are awesome. I love them. I used THIS tutorial for the fabric flower. On my last scripture case I put a ruffle on it like this HERE. If you would rather do one like this try this tutorial on making a ruffle HERE and then add it to the front piece before sewing together. That is pretty much it. ENJOY.
Let me know of any questions and please post links in the comments if you make one. I would love to see what you guys do!
Linking to some parties
Show and Tell @Blue Cricket Designs


Subscribe to:
Posts (Atom)