We are in Utah having a great time. I do not have internet on my lap top since I am not at home which means not much blogging for me since my pictures aren't on my moms lap top. BUT we are having a great time and enjoying soaking up some sun! So I don't neglect this blog for TOO long I have a simple and YUMMY recipe for all you folks who are grilling this summer. It's is stuffed Jalapenos. I have not tried them yet but my family raved about them. My sister Kim found the recipe. Here is what you need
1 lbs chorizo
10 big jalapenos
bacon
cheese
mix chorizo and a little bit of cheese. Cut jalapenos and de-seed them. Stuff with the chorizo and cheese mixture. Close the jalapeno up and wrap it with a piece of bacon and secure it together with a tooth pick. Next throw those puppies on the grill and enjoy! Like I said, I haven't tried them yet but my sister made them for my family one time and they LOVED them! I am hoping to make some when we get back to Cali! Enjoy your 4th of July and hopefully I'll be back in a couple of days to post some more.

Wednesday, June 29, 2011
Wednesday, June 22, 2011
HUGE
My friend Amanda asked me if I would make her a HUGE purse for summer. How could I pass that one up?! I LOVE making purses and even more so, I love making them for friends. So we decided on colors, I bought some fabric and then got started. I think it turned out cute. Wanna see?

This first picture is to give you an idea about how big it is. That is my daughter in the chair next to the purse. You know, the purse that is practically the same size as her....yup, it's big! haha

 A small pocket for cell phone, chap stick, keys....

3 gigantic pockets that go all the way across the other side for bottles, diapers, wipes.....


Aren't the ruffles pretty!? I have some more things that got crafted this week but they are for my home made gift exchange. I JUST mailed it off today so once she gets it I can post pictures I made a tutorial out of one of the things I sent her too so as soon as she gets it ( and I actually have internet ) I will be posting a quick, fun, EASY tutorial.
On a side note, because I am goign to Utah for two weeks I will NOT really have internet. I am freaking out a bit but it will be okay! ( at least that is what I keep telling myself. ) Normally I hook my lap top up to my phone but that is no longer an option since we started getting internet at our house. We turn off the wireless option on my phone. DOH! We'll see if I can get a blog or two in between now and when I get back. If not, have a great 4th of July and I'll see y'all when I get back!

This first picture is to give you an idea about how big it is. That is my daughter in the chair next to the purse. You know, the purse that is practically the same size as her....yup, it's big! haha


3 gigantic pockets that go all the way across the other side for bottles, diapers, wipes.....


Aren't the ruffles pretty!? I have some more things that got crafted this week but they are for my home made gift exchange. I JUST mailed it off today so once she gets it I can post pictures I made a tutorial out of one of the things I sent her too so as soon as she gets it ( and I actually have internet ) I will be posting a quick, fun, EASY tutorial.
On a side note, because I am goign to Utah for two weeks I will NOT really have internet. I am freaking out a bit but it will be okay! ( at least that is what I keep telling myself. ) Normally I hook my lap top up to my phone but that is no longer an option since we started getting internet at our house. We turn off the wireless option on my phone. DOH! We'll see if I can get a blog or two in between now and when I get back. If not, have a great 4th of July and I'll see y'all when I get back!
Chocolate Cinnamon
Doesn't that sound yummy? Chocolate cinnamon. Well, it at least sounds yummy to me! I FINALLY got around to using some of my empty chap stick tubes. I also finally used the deodorant tubes I bought! WOO HOO. I am leaving tomorrow to drive to Utah AGAIN. I have been promising my mom and dad some chocolate chap stick. This time I wanted one with some Bees Wax in it. I looked up some recipes and then adapted one for my liking. Here is what I did.

Chocolate Cinnamon Chap Stick


linking up to
Watcha Working With @ It's Toile Good


Chocolate Cinnamon Chap Stick
1 Tablespoon Cocoa Butter
1 Tablespoons Sweet Almond Oil
1 Tablespoon Avocado Oil
1 Tablespoon Olive Oil
1 Tablespoon & 1 teaspoon Beeswax
5-7 drops Cinnamon essential oil
6 to 10 chocolate chips
I should have entered a drop or so of Vitamin E and I forgot! I think this is plenty good for your lips without it though.
Here's what you do. Bees wax takes a while to melt. You want to take the bees wax, cocoa butter, sweet almond oil, olive oil and avocado oil and melt them together. Do this either in 10 second increments in the microwave or use a double broiler. Once the bees wax is all melted into the other oils you want to add you essential oil. If using Cinnamon it is VERY strong. I only used about 4 or 5 drops but I could have used a couple of more. I would rather have too little then too much though. Then add some vitamin E if you would like. Stir in the chocolate chips until they melt. I used 6 of them and again you could use more. Whatever you would like. This is just to add some flavor and to add some color. Don't let it cool TOO long before pouring into whatever it is you have to hold it in. I used my empty chap stick tubes and it took up about 9 to 10 of them.


And here is the deodorant in their cute little roll up tubes

I can't WAIT to roll this on instead of using my finger! WOO WOO for all natural home made products that won't cause harm or cancer! YEAH BABY!
linking up to
Watcha Working With @ It's Toile Good
Monday, June 20, 2011
Confessions of a Pizza-holic!
I LOVE pizza! Like.....LOOOOOOVE pizza. I could eat pizza everyday for a week if it was from a different place every time. I got really into making my own pizza about 2 years ago. For a long time I just used the same recipe over and over again. I didn't try anything new or play with it. I kinda get scared to experiment. Since we moved from Texas to California and I have no life ( no seriously haha ) I have taken up baking. I have baked and baked and BAKED since I moved. I am so glad I did not gain all the weight back that I have taken off since I had my last baby. It has been nice getting to know the kitchen better and trying new things AND experimenting! One thing I finally decide to mess around with was our pizza recipe.
Before moving onto my tips and tricks, I wanted to start off by telling y'all that I REALLY try to bake with whole wheat. My pizza recipe that I used called for half wheat flour and half white flour. I wanted to try and find one that was ALL wheat. It was nearly impossible. After discovering white wheat, which has been my savior in the kitchen, I usually use half white wheat and half wheat flour. For those of you who have no clue what white wheat is LOOK IT UP! You won't be sorry.
After many attempts at baking different kinds of pizza, my friend Sarah bought me a Whole Grain cook book for my birthday back in April. It has been wonderful. I have picked up a few things from it.
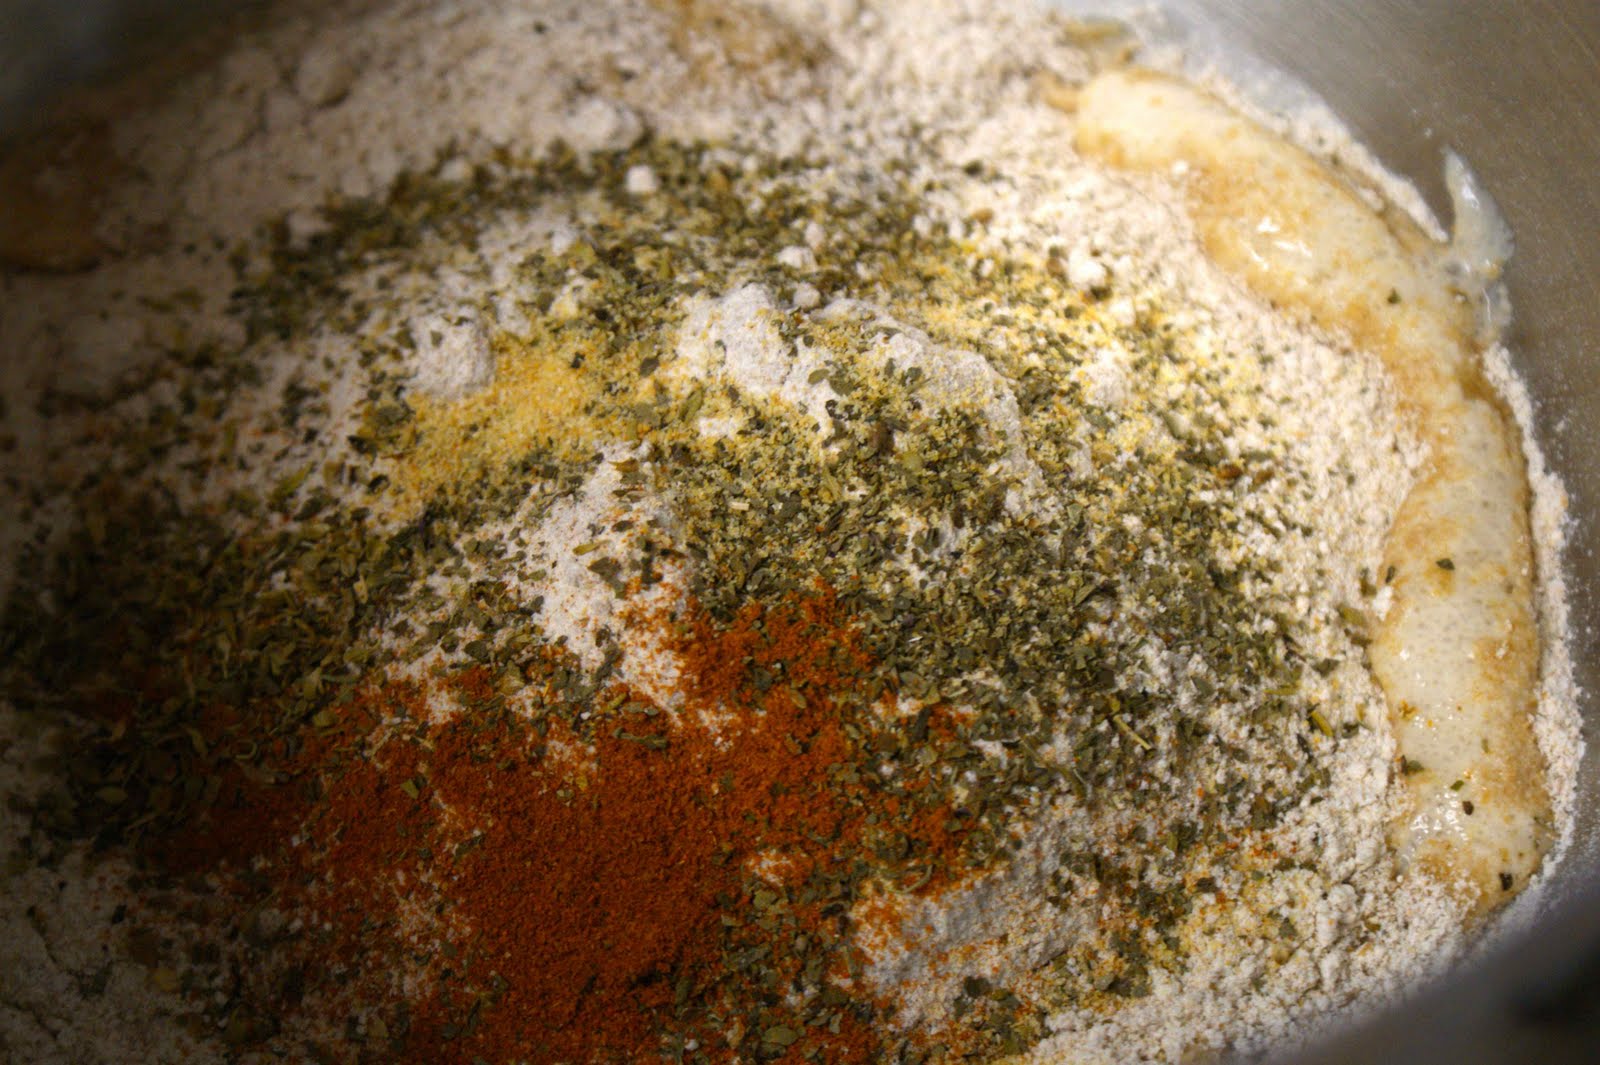
ONE- they have several different recipes for pizza dough. One thing I LOVED from one of the doughs was to add dry basil, dry oregano and some cayenne pepper to your flour mixture. Um can we say YUM! I have since started adding in some garlic powder too. Let me tell you this gives the dough a great flavor.

TWO- if you have cooked any kind of bread or rolls before you have been told to put a wet tea towel over the dough while it rises. I have done it a thousand times. My cook book says it used plastic wrap instead and I have to tell you that every since I started doing that my dough rises better and faster. SCORE!

THREE- Before I roll out my dough I put down a layer of Semolina Flour on the baking sheet or pizza pan. This makes the pizza crust, well CRUSTY! I LOVE this. The first time I did it I hadn't realized my pizza wasn't crispy before. Now I do this and my pizza is wonderfully crusty on the outside but still extra soft on the inside. You can also use corn meal but I like the semolina flour because it's more like really soft sand and isn't as corse ( in my opinion any ways )

FOUR- I roll my pizza out, poke it with holes with a folk so it doesn't get huge air bubbles in it and then I rub some olive oil on it to crisp it up. Then I put it in the oven at about 400 degrees for 5 to 6 minutes. This helps the dough cook up all the way. The thing with pizza is the toppings don't really need to "cook" and cheese does not take long to melt. Sometimes I need my crust to cook longer then planned and the mozzarella ends up burning a little. So take your time cooking the dough before topping it.
FIVE- pull it out of the oven and put on your toppings. I like to put down cheese then toppings, then sprinkle more cheese on. I also like to use lots of different kinds. Lately I have been into putting on provolone, then mozzarella, then some pepperoni and olives ( or Jalapenos ) and then a little cheddar and Parmesan. I don't used powdered Parmesan either. I can't STAND the smell of it. I use fresh kind. Put it in the over for another 8 to 10 minutes or until everything is nice and brown.
SIX- I pull the pizza out and immediately I spread melted butter on the crust and then rub some garlic on it. It makes it SOOOOOOOO good.
Here is a recipe I have found that I love. I have added some things to it but for the most part it was perfect the way I found it. Try it and use my six steps and you will NOT be sorry! Oh and of course ENJOY!
Pizza Dough
1tsp white sugar
1 Tbsp active dry yeast
1 1/2 cups warm water ( not too hot or you will de-activate the yeast! )
1 Tbsp olive oil
1 tsp salt
2 cups whole wheat flour
1 cup white wheat flour
1/2 tsp dry oregano
1/2 tsp dry basil
1/4 tsp cayenne pepper
1/4 tsp garlic powder ( or garlic salt )
dissolve sugar in warm water. Add yeast and let rise for about 10 minutes until nice and foamy.
Stir in olive oil and salt into yeast mixture and then add wheat flour and half of white wheat flour. Also add basil, oregano, cayenne pepper and garlic powder. Mix until the dough seems to be together. Add as much remaining flour as you can. If dough seems SUPER sticky, add more. Dough should be soft and not overly dry. Use dough hook on mixer or knead the dough by hand on a lightly floured surface. Place dough in an oiled bowl and cover with plastic wrap. Let rise one hour or until dough has doubled.
Now here is where you can do two things. One you can roll out the dough now on a layer of semolina flour on a cookie sheet or pizza pan ready to cook. OR you can let it rise a second time. It depends on my mood and how much time I have. Usually I don't let it rise again. This dough is pretty thick so I spread it out pretty thing because it expands even more when you cook it.
Now you just need to follow steps four, five and six and you are good to go! I usually set my oven to 400 and cook the first time about 7 minutes and the second time 8 to 10 minutes. I used to have my oven set at 500 but found that the inside of the dough wouldn't cook all the way.
Let me know if anyone tries this. I cooked it tonight and it was excellent. Sorry I didn't take a picture of the finished product but take my word for it, it was YUMMY! I love this too because for the most part it is pretty healthy. You are getting lots of fiber and depending on your toppings this can be a great source for some veggies.
One thing I didn't talk about was sauce. I make mine. Again this depends on my mood. USUALLY I take a can of organic Italian style tomatoes and throw them in my food processor with a small can of tomato sauce, some garlic and some olive oil. If you only have a regular can of tomatoes, then just throw in some dry basil and oregano in place of the "italian style" tomatoes. It's pretty much the same thing. Then I blend it until smooth but I know some people like chunky sauce so just do what you like. This is a pretty sweat tasting sauce. If you want it to taste more like a pasty sauce like you would get from Pizza Hut, then don't use can tomatoes and just use tomato sauce, basil, oregano and some garlic. Both are delicious. In fact the first sauce I gave you directions for is what I use when making any kind of pasta. We love it!
One last thing, ENJOY YOUR PIZZA! I know we do.


Before moving onto my tips and tricks, I wanted to start off by telling y'all that I REALLY try to bake with whole wheat. My pizza recipe that I used called for half wheat flour and half white flour. I wanted to try and find one that was ALL wheat. It was nearly impossible. After discovering white wheat, which has been my savior in the kitchen, I usually use half white wheat and half wheat flour. For those of you who have no clue what white wheat is LOOK IT UP! You won't be sorry.
After many attempts at baking different kinds of pizza, my friend Sarah bought me a Whole Grain cook book for my birthday back in April. It has been wonderful. I have picked up a few things from it.
ONE- they have several different recipes for pizza dough. One thing I LOVED from one of the doughs was to add dry basil, dry oregano and some cayenne pepper to your flour mixture. Um can we say YUM! I have since started adding in some garlic powder too. Let me tell you this gives the dough a great flavor.
TWO- if you have cooked any kind of bread or rolls before you have been told to put a wet tea towel over the dough while it rises. I have done it a thousand times. My cook book says it used plastic wrap instead and I have to tell you that every since I started doing that my dough rises better and faster. SCORE!

THREE- Before I roll out my dough I put down a layer of Semolina Flour on the baking sheet or pizza pan. This makes the pizza crust, well CRUSTY! I LOVE this. The first time I did it I hadn't realized my pizza wasn't crispy before. Now I do this and my pizza is wonderfully crusty on the outside but still extra soft on the inside. You can also use corn meal but I like the semolina flour because it's more like really soft sand and isn't as corse ( in my opinion any ways )

FOUR- I roll my pizza out, poke it with holes with a folk so it doesn't get huge air bubbles in it and then I rub some olive oil on it to crisp it up. Then I put it in the oven at about 400 degrees for 5 to 6 minutes. This helps the dough cook up all the way. The thing with pizza is the toppings don't really need to "cook" and cheese does not take long to melt. Sometimes I need my crust to cook longer then planned and the mozzarella ends up burning a little. So take your time cooking the dough before topping it.
FIVE- pull it out of the oven and put on your toppings. I like to put down cheese then toppings, then sprinkle more cheese on. I also like to use lots of different kinds. Lately I have been into putting on provolone, then mozzarella, then some pepperoni and olives ( or Jalapenos ) and then a little cheddar and Parmesan. I don't used powdered Parmesan either. I can't STAND the smell of it. I use fresh kind. Put it in the over for another 8 to 10 minutes or until everything is nice and brown.
SIX- I pull the pizza out and immediately I spread melted butter on the crust and then rub some garlic on it. It makes it SOOOOOOOO good.
Here is a recipe I have found that I love. I have added some things to it but for the most part it was perfect the way I found it. Try it and use my six steps and you will NOT be sorry! Oh and of course ENJOY!
Pizza Dough
1tsp white sugar
1 Tbsp active dry yeast
1 1/2 cups warm water ( not too hot or you will de-activate the yeast! )
1 Tbsp olive oil
1 tsp salt
2 cups whole wheat flour
1 cup white wheat flour
1/2 tsp dry oregano
1/2 tsp dry basil
1/4 tsp cayenne pepper
1/4 tsp garlic powder ( or garlic salt )
dissolve sugar in warm water. Add yeast and let rise for about 10 minutes until nice and foamy.
Stir in olive oil and salt into yeast mixture and then add wheat flour and half of white wheat flour. Also add basil, oregano, cayenne pepper and garlic powder. Mix until the dough seems to be together. Add as much remaining flour as you can. If dough seems SUPER sticky, add more. Dough should be soft and not overly dry. Use dough hook on mixer or knead the dough by hand on a lightly floured surface. Place dough in an oiled bowl and cover with plastic wrap. Let rise one hour or until dough has doubled.
Now here is where you can do two things. One you can roll out the dough now on a layer of semolina flour on a cookie sheet or pizza pan ready to cook. OR you can let it rise a second time. It depends on my mood and how much time I have. Usually I don't let it rise again. This dough is pretty thick so I spread it out pretty thing because it expands even more when you cook it.
Now you just need to follow steps four, five and six and you are good to go! I usually set my oven to 400 and cook the first time about 7 minutes and the second time 8 to 10 minutes. I used to have my oven set at 500 but found that the inside of the dough wouldn't cook all the way.
Let me know if anyone tries this. I cooked it tonight and it was excellent. Sorry I didn't take a picture of the finished product but take my word for it, it was YUMMY! I love this too because for the most part it is pretty healthy. You are getting lots of fiber and depending on your toppings this can be a great source for some veggies.
One thing I didn't talk about was sauce. I make mine. Again this depends on my mood. USUALLY I take a can of organic Italian style tomatoes and throw them in my food processor with a small can of tomato sauce, some garlic and some olive oil. If you only have a regular can of tomatoes, then just throw in some dry basil and oregano in place of the "italian style" tomatoes. It's pretty much the same thing. Then I blend it until smooth but I know some people like chunky sauce so just do what you like. This is a pretty sweat tasting sauce. If you want it to taste more like a pasty sauce like you would get from Pizza Hut, then don't use can tomatoes and just use tomato sauce, basil, oregano and some garlic. Both are delicious. In fact the first sauce I gave you directions for is what I use when making any kind of pasta. We love it!
One last thing, ENJOY YOUR PIZZA! I know we do.
Linking up to Tuesdays at the Table
Sunday, June 19, 2011
A Few Projects
I have had some sewing projects this week. Sometime I have crazy weeks for no reason. Sometimes I have a lot of sewing I have to do. Sometimes the house is a MESS and someone is coming and I have to clean. This week my house wasn't too dirty but we were having people over for dinner Tuesday so I did need to clean some. Mainly the kitchen. I HATE doing the dishes so often they pile up. Ours were piled up.
I got our house cleaned and a couple of small projects done early in the week. I FINALLY got my other flowers sewn on the purse I made myself. I had decided on the three flowers a while ago but then just kept putting off actually sewing them on. I like to sew the flowers and not glue them. Especially when it was going on a purse I sewed. It takes longer but sometimes it is worth it.
I'm babbling, I know. Here are some of the things I can show you that I worked on.
First I got a custom order for someone on etsy again. She wanted a garter set for her wedding. She wanted them really simple and she wanted her future husband's name on a charm hanging from it. Here is what I made


Then I had been asked from someone at church to make her daughter a scripture case. Not sure if you remember the auction I talked about having at church a couple of months ago. I had made a scripture case for it and two different girls tried to win it. The one who didn't win asked me to make her one EXACTLY like the one the other girl won. I know how girls can be, especially young girls. I didn't want to do it exactly the same just in case the other girl got upset. SOOOO I made the case the same but changed the flower on it.

I made the flower so it can come off and I put an alligator clip on it so she could put it in her hair if she wanted!

Do you see the perfect pink felt circle on the back of the flower pin? I found them on etsy and I LOVE them. YOu get 10 of the circles and they are self adhesive for only $1.99. The store is called Bitsy Bands. Click on the link if you want to check out their store. LOTS of good supplies for really cheap there. I bought like 5 or 6 things from them and with shipping I only spent 11 dollars! Score.
The other thing I can actually show you is this bow tie I made someone at church.

I LOVE this bow tie. I bought a fat quarter at JoAnn's when they were on sale and I KNEW I wanted to make a bow tie. There is this cute boy at church who is 7 to 9 months old. Not sure exactly and I don't even know his name. I know his mom and in a couple of weeks I am going to be taking pictures of her kids. I seriously CAN'T wait!
The other things I sewed this week were for my home made gift exchange. I can't wait to send her stuff on Monday and for her to get them so I can show you the fun stuff I am sending her. It was fun making stuff for someone you don't know.
Happy Sunday everyone. I hope you had time for all of your projects. I have a list a mile long and I am leaving Thursday for Utah so I have limited time to do it. Let's hope I can manage my time good!
Wednesday, June 15, 2011
Added
I forgot to add to my last post about smoothies that sometimes I put some coconut oil in my smoothie! haha The first time I did it I didn't like it at first. By the end of the smoothie I was used to it and thought it was pretty yummy! Don't forget coconut oil is safe to have a table spoon or two a day! So why not consume it in a yummy smoothie!
Have a fabulous Wednesday!
Have a fabulous Wednesday!
Tuesday, June 14, 2011
Smoothies
My baby girl and I have been enjoying fruit smoothies for breakfast in the morning. When I say smoothie I really mean HEALTHY smoothie. Not all smoothies are that healthy! I used to think I was making healthy ones because I used low fat non fat ICE CREAM and apple juice! YIKES! Now I REALLY make HEALTHY ones.
This mornings smoothie was
5 strawberries
10 blue berries
5 raspberries
a hand full of spinach leaves
about 3 or 4 baby carrots.
Sounds really weird right? Carrots and spinach throwing you off? Let me tell you, they cut out all of the sweetness of the fruit. I added a little bit of water too. Sometimes I add flax seed. If I add flax seed I try and drink it all. The flax seed blows up if you freeze it and then defrost it. :) Sometimes I also add low fat plain yogurt.
Sometimes I also add bananas, oranges, peaches and apples. I HEARD broccoli doesn't leave a taste in the smoothie either but I haven't tried it yet. I SWEAR to you you can NOT taste the carrot or the spinach. Try it.
My daughter LOVES sharing these with me. She says, "I want fruit momma!"

This is right after she enjoyed the one from this morning. Can't argue with that face! Enjoy
Monday, June 13, 2011
Update
Two things: ONE I made a video tutorial for my ribbon flower. I tried uploading it through blogger but it's too big. This means I am going to have to try and upload it on You Tube, which I have never done. In other words, it is going to be a few more days because tomorrow and Wednesday and going to be busy for me. Possibly Wednesday afternoon I can get it done.
Second: I updated my steering wheel cover for my car! Last year I made a super boring one and the fabric I used slipped so it would drive me crazy when I drove. It was also slightly too long and hung down on the sides further then I would have liked it. Well, today I used my own tutorial ( is that lame that I seriously looked up my OWN tutorial and then used it? ) With those things in mind, I used flannel and made the sides half an inch smaller around and it worked perfect! Now, I didn't drive with it yet today but when I tested it out it seemed to not be slipping at all. So here it is


Isn't it cute? I love my fabric!!! Now, this will have to be taken off every time my husband drives but it will be so worth it. And even though I am NOT a pink person, this was too cute to pass up. I do link PINK and BLACK together so it's all good.
So here is the tutorial if you want to try and make one yourself HERE
And hopefully in a day or two I will have the video up for y'all, which I felt totally retarded making by the way! haha People who make those things regularly have to be so confident.
Tomorrow I am going to the post office to pick up a package that arrived for me so I'll let you know how the steering wheel. Do you know what my package is? I ordered 4 backdrops from someone on etsy for when I do my photography! I am SO excited about them too. I can't WAIT to get some people here to take pictures of now. If only I could persuade someone to come....
PS I made other things today that are either not done or part of my home made gift exchange so I CAN'T show them on here yet. Not until my person gets it in the mail. I can't wait to be able to post pictures.
Second: I updated my steering wheel cover for my car! Last year I made a super boring one and the fabric I used slipped so it would drive me crazy when I drove. It was also slightly too long and hung down on the sides further then I would have liked it. Well, today I used my own tutorial ( is that lame that I seriously looked up my OWN tutorial and then used it? ) With those things in mind, I used flannel and made the sides half an inch smaller around and it worked perfect! Now, I didn't drive with it yet today but when I tested it out it seemed to not be slipping at all. So here it is

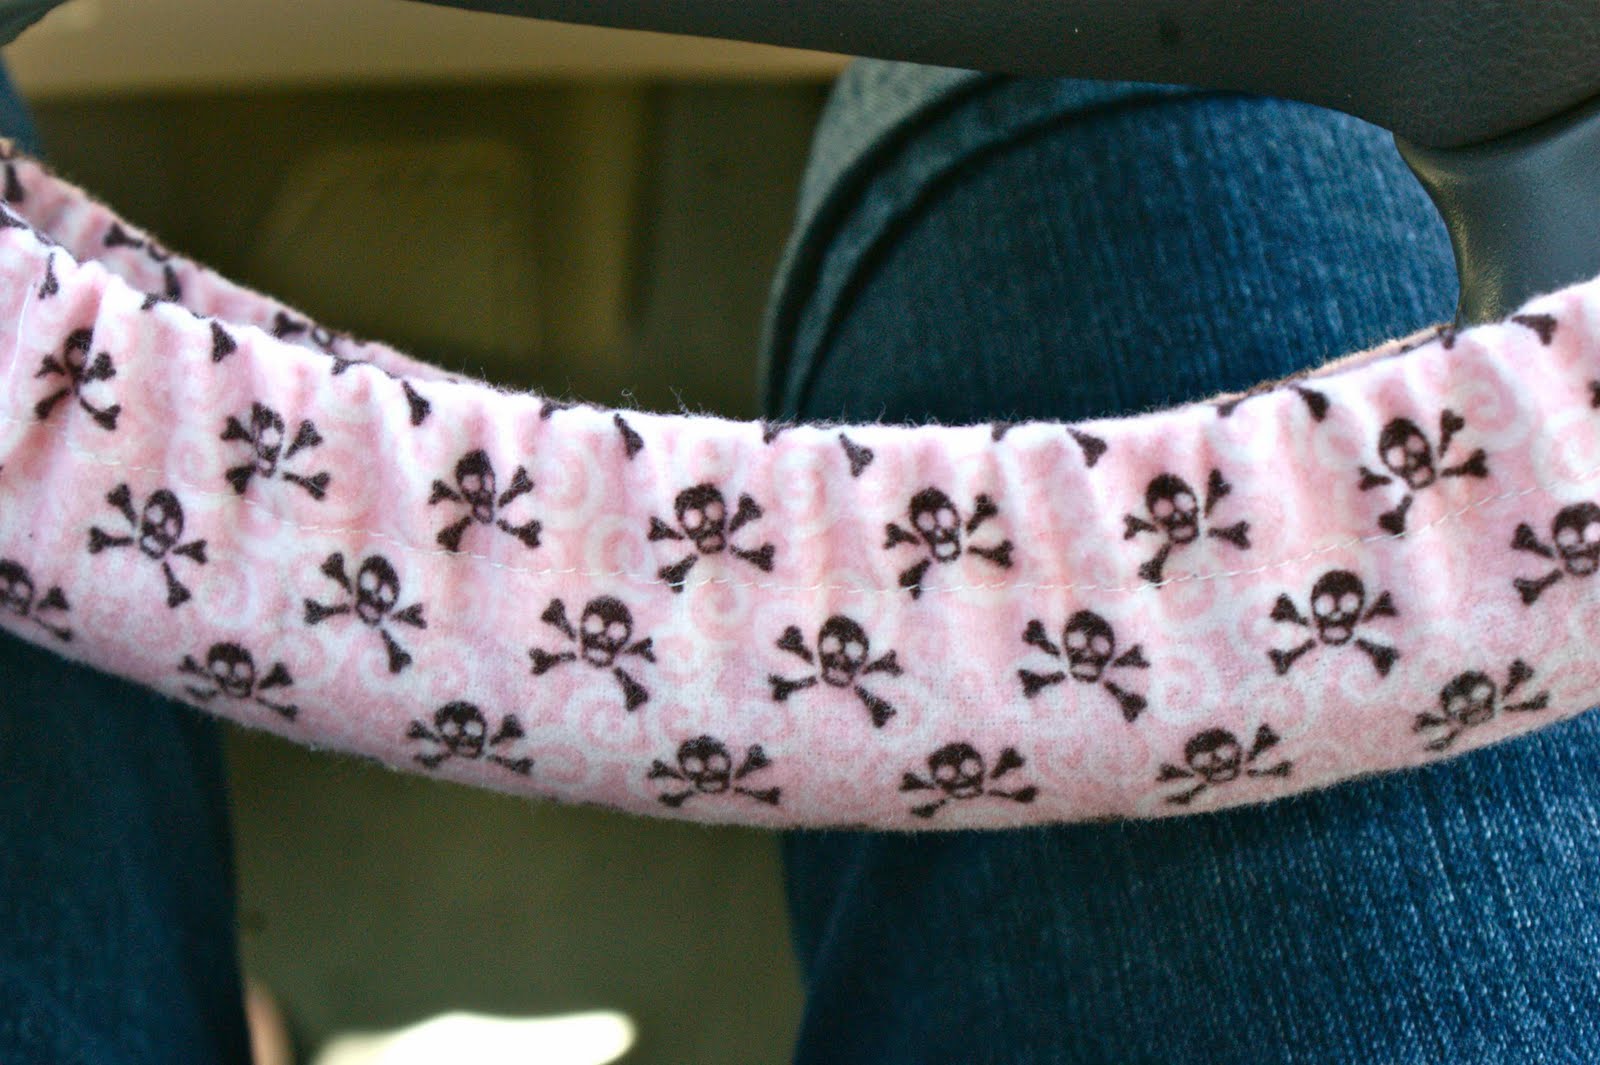

Isn't it cute? I love my fabric!!! Now, this will have to be taken off every time my husband drives but it will be so worth it. And even though I am NOT a pink person, this was too cute to pass up. I do link PINK and BLACK together so it's all good.
So here is the tutorial if you want to try and make one yourself HERE
And hopefully in a day or two I will have the video up for y'all, which I felt totally retarded making by the way! haha People who make those things regularly have to be so confident.
Tomorrow I am going to the post office to pick up a package that arrived for me so I'll let you know how the steering wheel. Do you know what my package is? I ordered 4 backdrops from someone on etsy for when I do my photography! I am SO excited about them too. I can't WAIT to get some people here to take pictures of now. If only I could persuade someone to come....
PS I made other things today that are either not done or part of my home made gift exchange so I CAN'T show them on here yet. Not until my person gets it in the mail. I can't wait to be able to post pictures.
Saturday, June 11, 2011
Subway Art
Subway art is SOOOOO popular right now! I love the graphics involved. I love putting words on pictures. If you have followed my blog for a while you know I have a printer that prints on canvas and it prints HUGE! I LOVE IT! I have pictures of my kids with a famous religious song on them. My son's picture has the first verse of the Mormon primary song, "I AM A Child Of God." and then my girls picture has the Chorus of that song on it and I hung them right next to each other. I love them and I always get compliments when people come over to my house.
Well, last week I was looking through all of the people who linked up projects over at Sew Much Ado . I saw this
SUBWAY ART
And I really liked how it had the red hearts mixed with the black wording. I have been wanting to try one of these. Later on that day was church. I was sitting during the last hour listening to this wonderful lesson about how we must make Christ the center of our families and something clicked! Before I went to bed that night I went to Pic Nik.com and started working on my own. I made the word CHRIST the center of the collage and then tried to do anything pertaining to family all around it. Funny thing is, it looks A LOT like the collage I had found. Apparently she made it at Pic nik too because the hearts are exactly the same.
ANY WAYS. I printed it out and was going to frame it. I got a couple of frames out and it was too big for ALL of the 8X10 frames I had. Isn't it frustrating that most frames that say 8X10 are actually a little smaller?! SOOOOO I am going to have to find another frame but until then here is he collage I made

Hopefully I can find a frame so I don't have to try and shrink it slightly. What a pain that will be! :)
Oh and just so I don't seem like a COMPLETE copy cat I didn't steal her words. Even the XOXO I swear I used for a reason. I signed pretty much every letter, email anything with XOXO so I swear it was ME. haha Enjoy your Saturday Y'all!
Thursday, June 9, 2011
Dryer Sheets
So who here hates throwing away dryer sheets? I feel like a horrible person every time I do. Why? Because it seems like SUCH a waste. I mean you use it once, twice MAYBE three times and then you throw it away. Back in April I started to collect mine. I had something in mind for mine to do for Green Month. They take a while to collect a bunch. I have actually meant to do this a WHILE ago but have been lazy. Not sure why either since this took me literately 5 minutes to do and that was mostly because I had to take pictures for y'all to see.
So here is my stack of sheets

First let me back up and tell you what problem we are taking on. I have a garage where my laundry is. We live in a golf course community and so we are part of an association. This means rules. One of the rules are that our trash cans have to be so far away from our front door. To solve this problem we keep our trash cans in the garage. PROBLEM being I still have a baby in diapers and we don't use cloth. Boooo for us not using cloth ( I know shame on me ). As most of you know, it's getting HOT. This basically cooks the poop smell and it is overwhelming as soon as you open the door. GROSS! Makes me not want to do laundry and I already hated doing that. SOOOO here is what I decided to do.
Take your stack of dryer sheets and grab them right in the middle.

Now take some string, thread, yarn, ribbon or in my case a cute shoe lace and tie it around the middle. Like so

Next, take all of the sheets and spread them around. Try and make it cute and as much like a ball as you can.

Next I opened up my essential oils

And I decided on Cinnamon but the Rosemary would have been a good choice too.

Sprinkle some on and then kinda scrunch it around a little.

Find a spot to hang it up!

 Did it work? Um, YEAH! My husband went to the garage to throw something away and he said, "Why does it smell like cinnamon?" I made a face and then showed it to him and told him what I did. I expected a weird look from him but not so. It was down with the garage smelling like cinnamon instead of poop! haha I am down with it too. I loved that I killed two birds with one stone!
I am linking up to


So here is my stack of sheets

First let me back up and tell you what problem we are taking on. I have a garage where my laundry is. We live in a golf course community and so we are part of an association. This means rules. One of the rules are that our trash cans have to be so far away from our front door. To solve this problem we keep our trash cans in the garage. PROBLEM being I still have a baby in diapers and we don't use cloth. Boooo for us not using cloth ( I know shame on me ). As most of you know, it's getting HOT. This basically cooks the poop smell and it is overwhelming as soon as you open the door. GROSS! Makes me not want to do laundry and I already hated doing that. SOOOO here is what I decided to do.
Take your stack of dryer sheets and grab them right in the middle.

Now take some string, thread, yarn, ribbon or in my case a cute shoe lace and tie it around the middle. Like so

Next, take all of the sheets and spread them around. Try and make it cute and as much like a ball as you can.

Next I opened up my essential oils

And I decided on Cinnamon but the Rosemary would have been a good choice too.

Sprinkle some on and then kinda scrunch it around a little.

Find a spot to hang it up!


I am linking up to
Thankful Thursday
Last week my family was on vacation at Disneyland so I didn't get to do my thankful Thursday ( and only on the second week! sheesh! ) So this week I guess I should do TWO things I am thankful for on this lovely Thursday afternoon.
ONE, I am thankful for my beliefs. Whether that be spiritual, political, economical WHATEVER they may be. I am thankful I have my own opinions and they someone doesn't have to GIVE them too me. My husband and I were watching a movie last night and he had an entirely different view on it then I did. That's okay. if we all thought the same how boring would that make us all!?
TWO, I am thankful for my son, Tyler. He is super smart and sometimes that makes it hard to be around him all of the time. He talks NON-STOP! Lately that has been driving me up the wall. He literately thinks he HAS to be talking and when we ask him to be quiet and eat, brush teeth, go to the bathroom; whatever it may be, he says, "But I just can't help it" He has SOOOO much going on in his head and I will be SO grateful when he starts kindergarten in September. He NEEDS it so bad and I need it so bad too. But for now, I am thankful for him and his sweet spirit. He really is a joy to have, even if sometimes I want to rip my hair out. I LOVE HIM! And I am thankful he is so smart. It gets me off of the hook a lot when doing things like reading and playing games, but it makes things harder because he WANTS to understand how everything works and sometimes there is just NO WAY of teaching a 5 year old somethings.
So what are you thankful for this week?
Wednesday, June 8, 2011
SUPER!
So yesterday I was looking for fabric flower tutorials and came across the best blog ever as far as hair bows goes. I FELL IN LOVE! I went through this blog off and on for over 2 hours during nap time and while my kids were playing. SOOOOO much good stuff on there if you like to make hair things and lovely fabric flowers like me! Go check them out. I just entered there link party here

Or you can go to their main blog page by clicking HERE Seriously AWESOME!
On a side note, do you remember that custom piece I said I did for someone's wedding on my etsy?!

Well, she got it in the mail, loved it and asked me if I could make her a garter to match. I think it turned out really cute!

The S+D is her and her soon to be husband's initials. I love it!
Ribbon Flower Tutorial
I have searched ALLLLLLLL over the internet at fabric flower tutorials. SERIOUSLY. I have looked at so many that they pretty much just all run together and when I go to make something, who knows whats going to come out of it. It's fun to see what other people come up with. Sometimes I hate something, yet they have a thousand comments telling them how wonderful it looks. Other times I fall in love with something and no one has commented at all. That is what is so awesome about the craft world. YOu don't have to like everything!
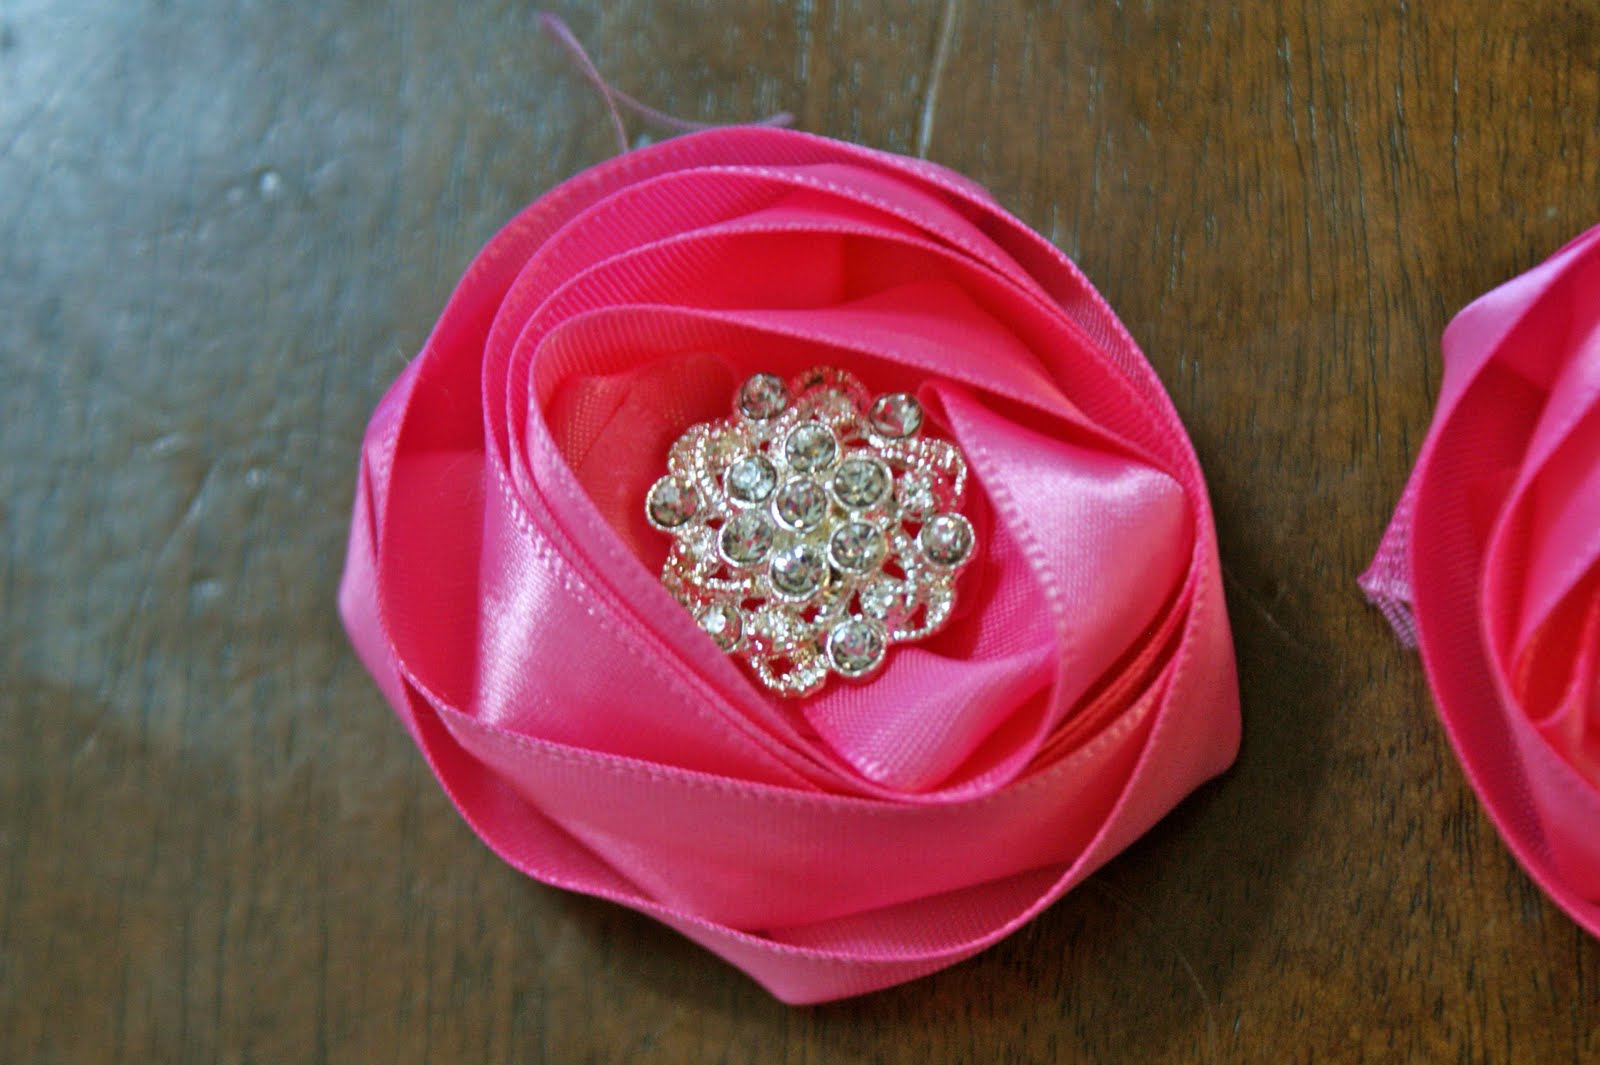
I search etsy a lot too! Not for tutorials, but for cute hair things I really like. Then I will recreate it and try and add a little bit of a spin on it. Sometimes though, I see something and think, "How did they do that?" That is when I search for tutorials on line. There are some I simply just can't find. Or someone wants you to pay for them. I'm cheap guys. I don't like paying for instructions. So there I was staring a a picture of a flower and something clicked. So I tried it and even though it wasn't exactly what the picture looked like, it was pretty darn close. So here is my little tutorial on how to make one of these satin ribbon roses with your own two little hands and a needle and thread.

SUPPLIES
Ribbon ( I used 1 1/2 inch hot pink satin )
needle
thread
First things first you want to take your ribbon and hold it near the end and then create a fold.


See how creating the little fold makes the ribbon cup up on the sides? This is what we want to do. Here is the underside

Now you want to take that needle and thread and make a stitch or two here to hold it together.

Now you want to make another tuck

And another stitch

See how this is forming the walls of the flower now? Keep tucking and stitching. I don't stitch EVERY tuck. But the first 2 or 3 I do. Remember that you want to keep in mind how big you want you flower. I make this outsider circle as big as you want the flower to be or as little as you want the flower to be.

Here a tuck, there a tuck, every where a tuck tuck...and some stitches

Notice now that I have 5 or 6 tucks I have created more walls to my flower. You want to keep making the walls smaller which means making the tucks bigger AND making sure that before you stitch the tuck is making the shape that gives you the wall and not doing something else. Sometimes, I had to retuck ad then stitch.
Eventually you will start to run out of space. This is where you can cut the ribbon and start to make your middle. I kinda scrunched my ribbon up to my liking and then stitched again.


Isn't it pretty?! I love how they come out. My suggestion is the first time you make one don't stitch at all. Just get a feel for how to do it. Then un do everything and then try again and then stitch. I always do this the first time I try something. This way if I screw up, it's not permeant.

Now you need to do decide what to do with your center. I wanted the center to be hallow so I could attach a huge vintage inspired button that I got at JoAnn's the other day.

My second one I started the outside out smaller. I ended up with a bunch of ribbon that I didn't want to cut off so I scrunched it up cute and sewed it down. Then I added some fake pearls to the center. I love this one too.

I havent' finished the one with the pearls but for the other one I added some russian veiling, guinea feathers and a green felt leaf. I then added it to a elastic headband for a tiny baby. Ain't it cute?


So now go and create! If you have any questions just let me know but it is seriously simple once you try it once or twice. Remember just tuck and stitch. You can't go wrong.
Linking up to some parties


Trendy Treehouse Show and Share @ Just a girl blue cricket design
I search etsy a lot too! Not for tutorials, but for cute hair things I really like. Then I will recreate it and try and add a little bit of a spin on it. Sometimes though, I see something and think, "How did they do that?" That is when I search for tutorials on line. There are some I simply just can't find. Or someone wants you to pay for them. I'm cheap guys. I don't like paying for instructions. So there I was staring a a picture of a flower and something clicked. So I tried it and even though it wasn't exactly what the picture looked like, it was pretty darn close. So here is my little tutorial on how to make one of these satin ribbon roses with your own two little hands and a needle and thread.

SUPPLIES
Ribbon ( I used 1 1/2 inch hot pink satin )
needle
thread
First things first you want to take your ribbon and hold it near the end and then create a fold.


See how creating the little fold makes the ribbon cup up on the sides? This is what we want to do. Here is the underside

Now you want to take that needle and thread and make a stitch or two here to hold it together.

Now you want to make another tuck

And another stitch

See how this is forming the walls of the flower now? Keep tucking and stitching. I don't stitch EVERY tuck. But the first 2 or 3 I do. Remember that you want to keep in mind how big you want you flower. I make this outsider circle as big as you want the flower to be or as little as you want the flower to be.

Here a tuck, there a tuck, every where a tuck tuck...and some stitches

Notice now that I have 5 or 6 tucks I have created more walls to my flower. You want to keep making the walls smaller which means making the tucks bigger AND making sure that before you stitch the tuck is making the shape that gives you the wall and not doing something else. Sometimes, I had to retuck ad then stitch.
Eventually you will start to run out of space. This is where you can cut the ribbon and start to make your middle. I kinda scrunched my ribbon up to my liking and then stitched again.


Isn't it pretty?! I love how they come out. My suggestion is the first time you make one don't stitch at all. Just get a feel for how to do it. Then un do everything and then try again and then stitch. I always do this the first time I try something. This way if I screw up, it's not permeant.

Now you need to do decide what to do with your center. I wanted the center to be hallow so I could attach a huge vintage inspired button that I got at JoAnn's the other day.
My second one I started the outside out smaller. I ended up with a bunch of ribbon that I didn't want to cut off so I scrunched it up cute and sewed it down. Then I added some fake pearls to the center. I love this one too.

I havent' finished the one with the pearls but for the other one I added some russian veiling, guinea feathers and a green felt leaf. I then added it to a elastic headband for a tiny baby. Ain't it cute?


So now go and create! If you have any questions just let me know but it is seriously simple once you try it once or twice. Remember just tuck and stitch. You can't go wrong.
Linking up to some parties
Subscribe to:
Posts (Atom)